Create a Paper Pop-Up Card

Create a Paper Pop-Up Card

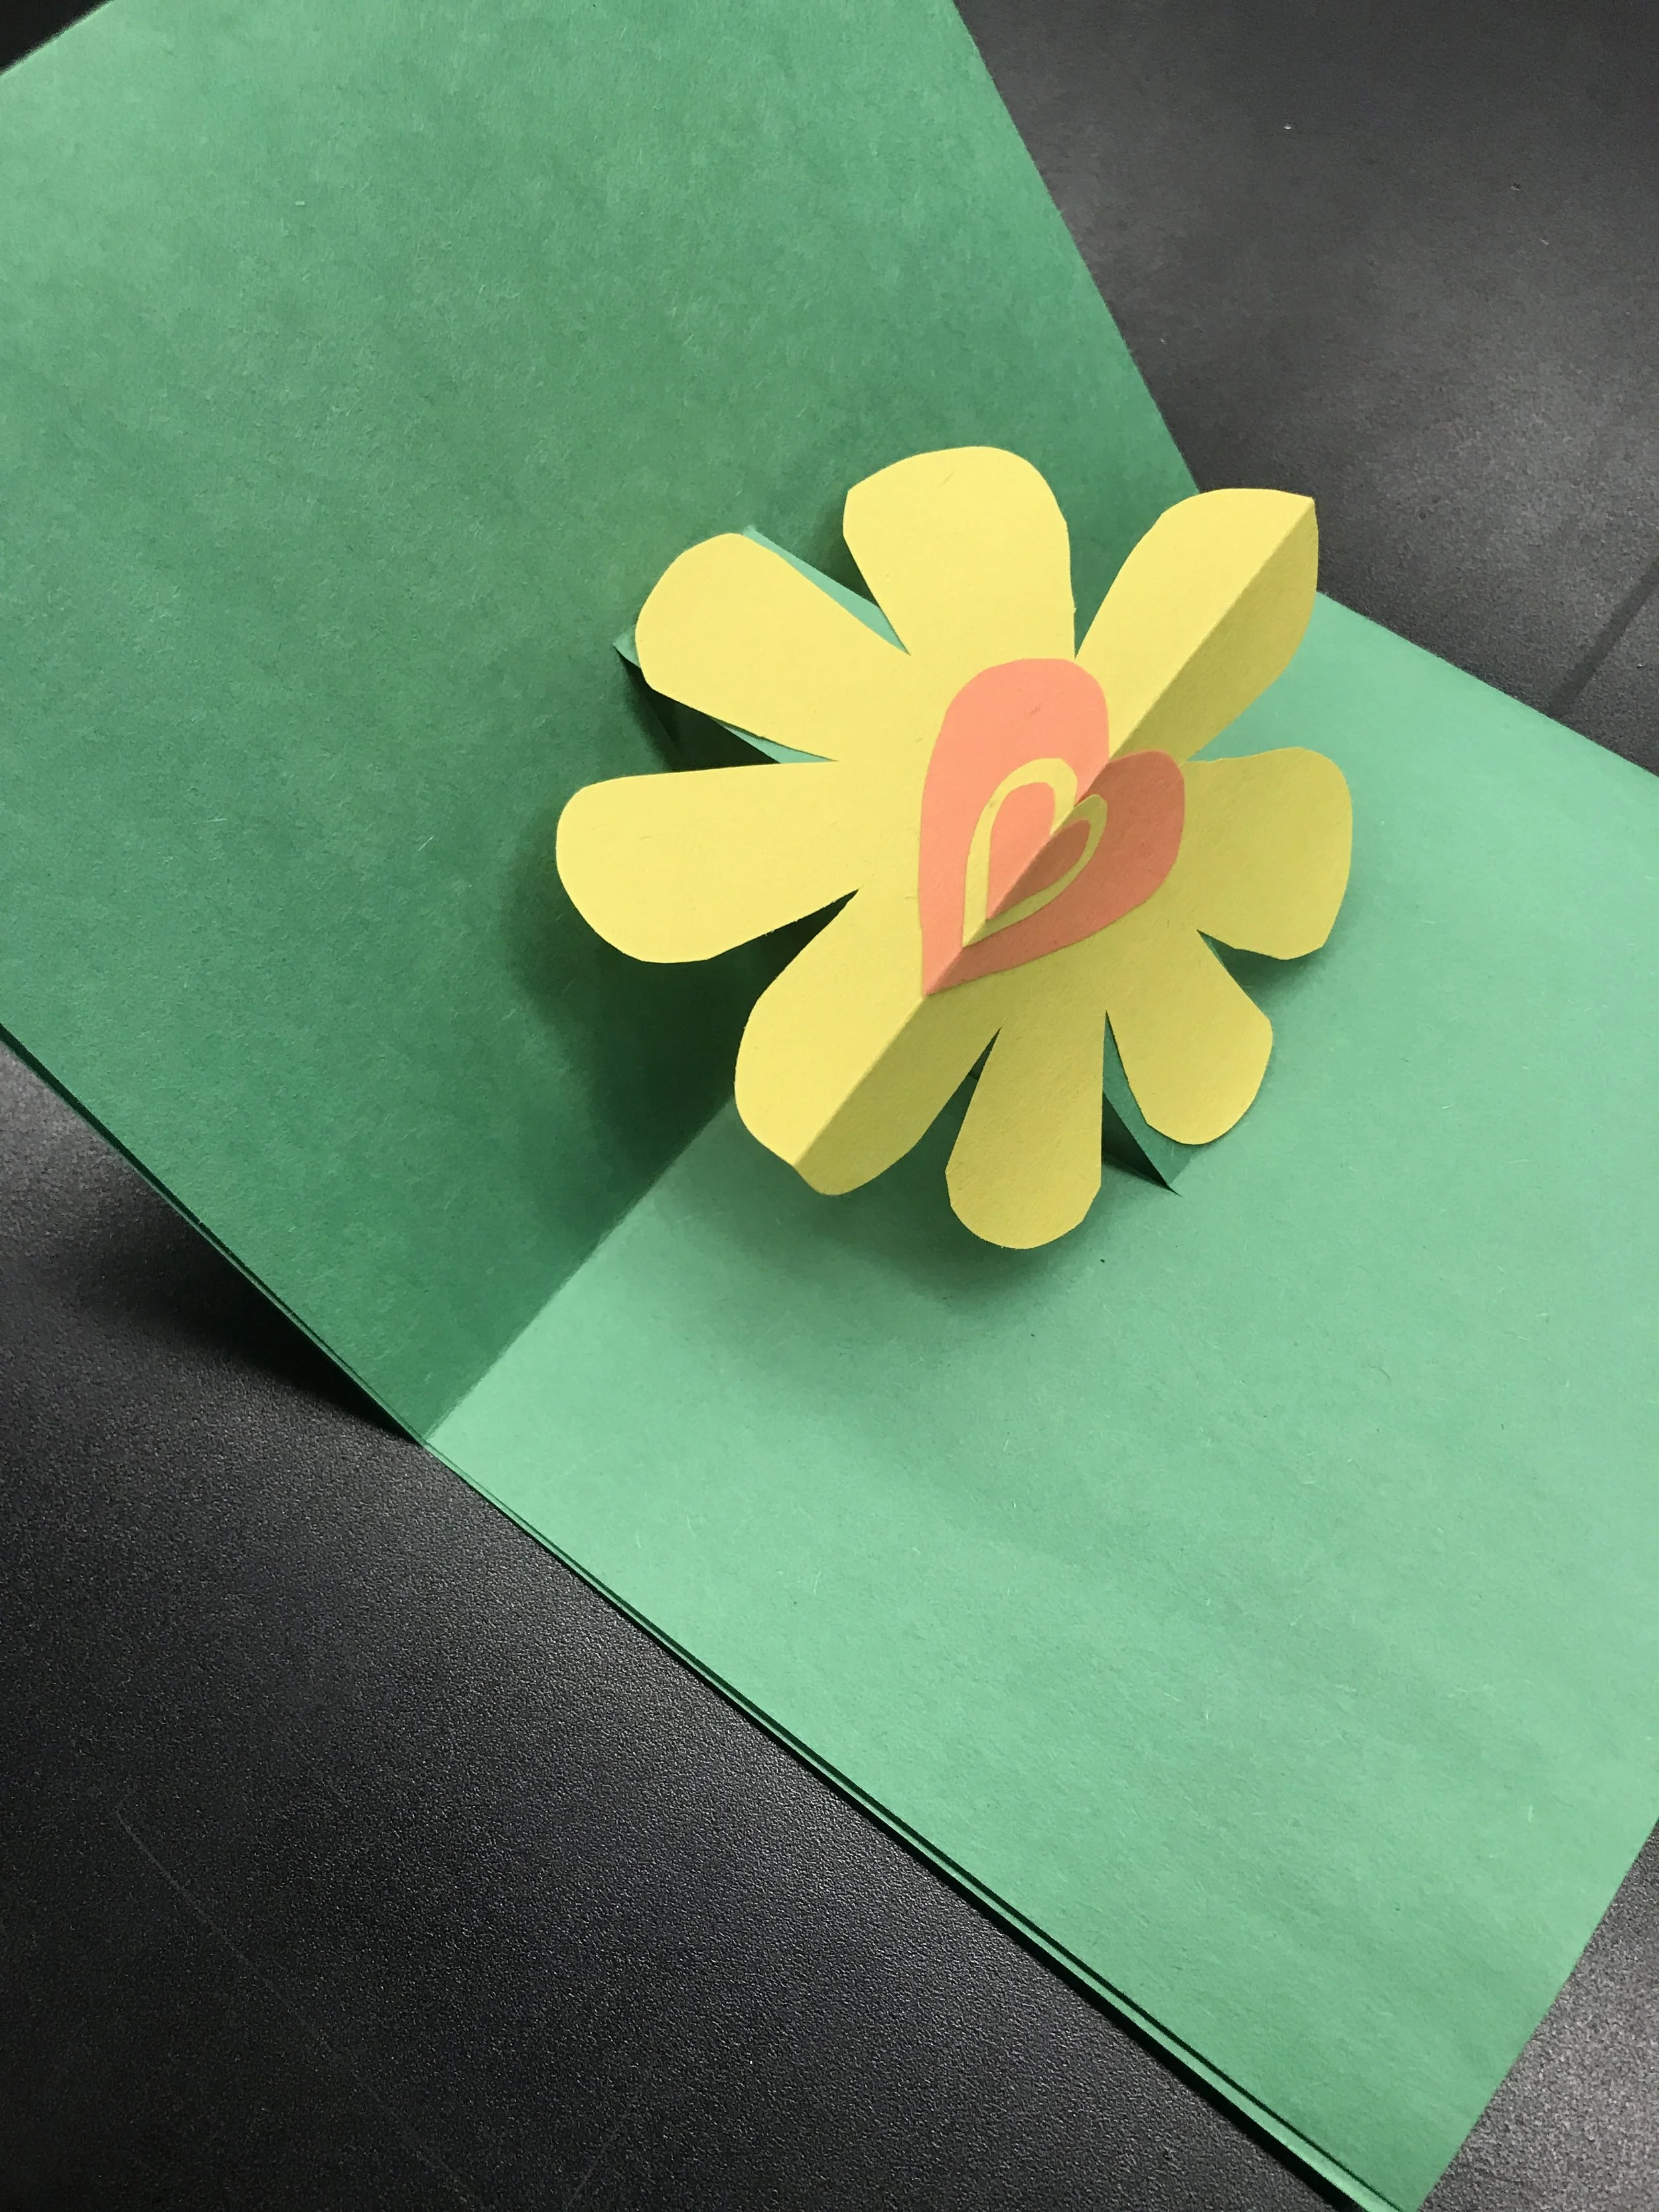
Create a Paper Pop-Up Card to Share!

When we want to show someone we care about them, we often send or give them a card with a kind message written inside. Sometimes, we show them a little extra enthusiasm by including a drawing, photo, or other surprise in the card or envelope.

In this guide, you will consider acts of care and caregiving, then create, decorate, and write a message in a small construction paper pop-up card to give to a person you care about. 

This project will take 30-60 minutes to complete depending on the level of detail in your card design. This activity is recommended for participants ages 5 and older, but younger children can participate with the help of an adult. 

Project Set Up

Find a large, flat surface on a desk, table, or even the floor to set up and work! 

Materials

  • Construction paper

  • Glue stick

  • Scissors (not included)

  • Pencil 

  • Crayons

  • Optional: stamps, stickers, glitter glue, or other decorative materials (not included) 


Instructions

Let’s create a pop-up card!

Think about a person you care about who you would like to give a card to. If you’re having trouble picking one person, think of someone who you haven’t told in a while how much you care for them, or someone who could use an extra reminder that they are cared for. What do you love about them? Why are you glad they are part of your life?


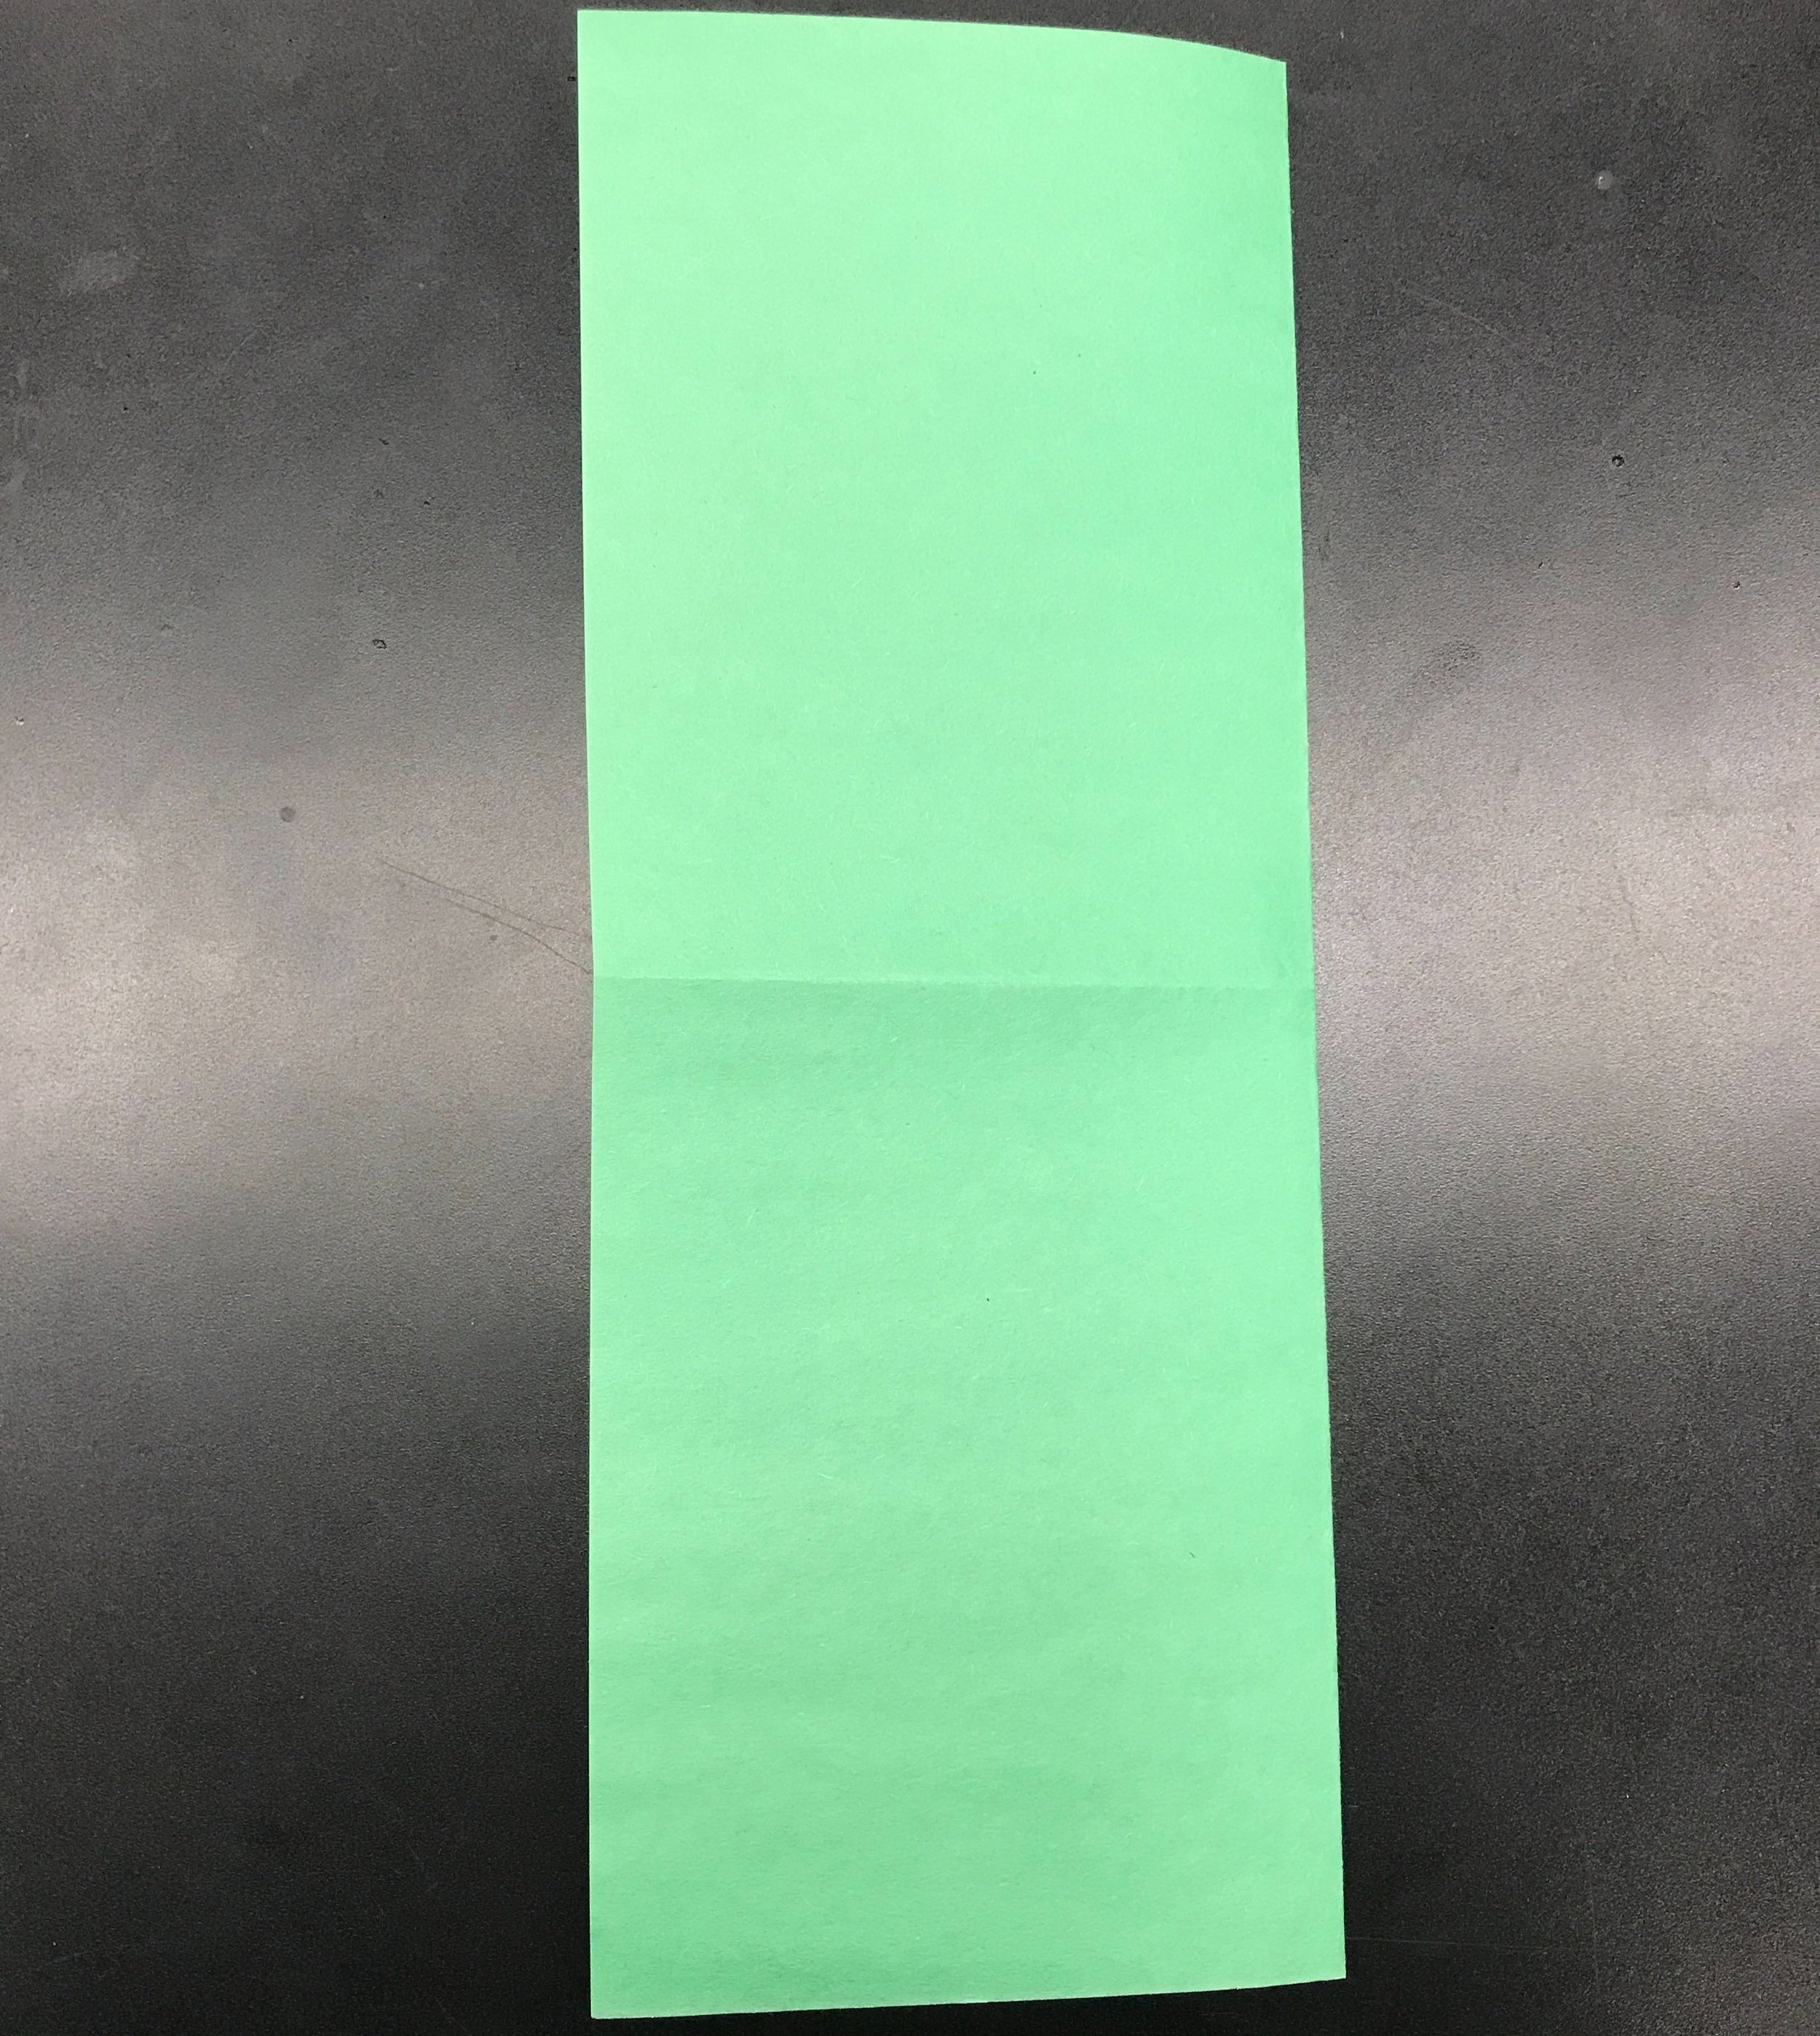
Step One: Choose a piece of construction paper to use as the base of the card, and lay it down on a flat surface so the short side is closest to you. Fold in half by bringing the top side to the bottom and making a crease. Then fold it again by bringing the left side to the right side and making another crease so that it makes a smaller rectangle that opens like a card.


Step Two: Unfold the paper, and re-fold once by bringing the right side to the left side. 


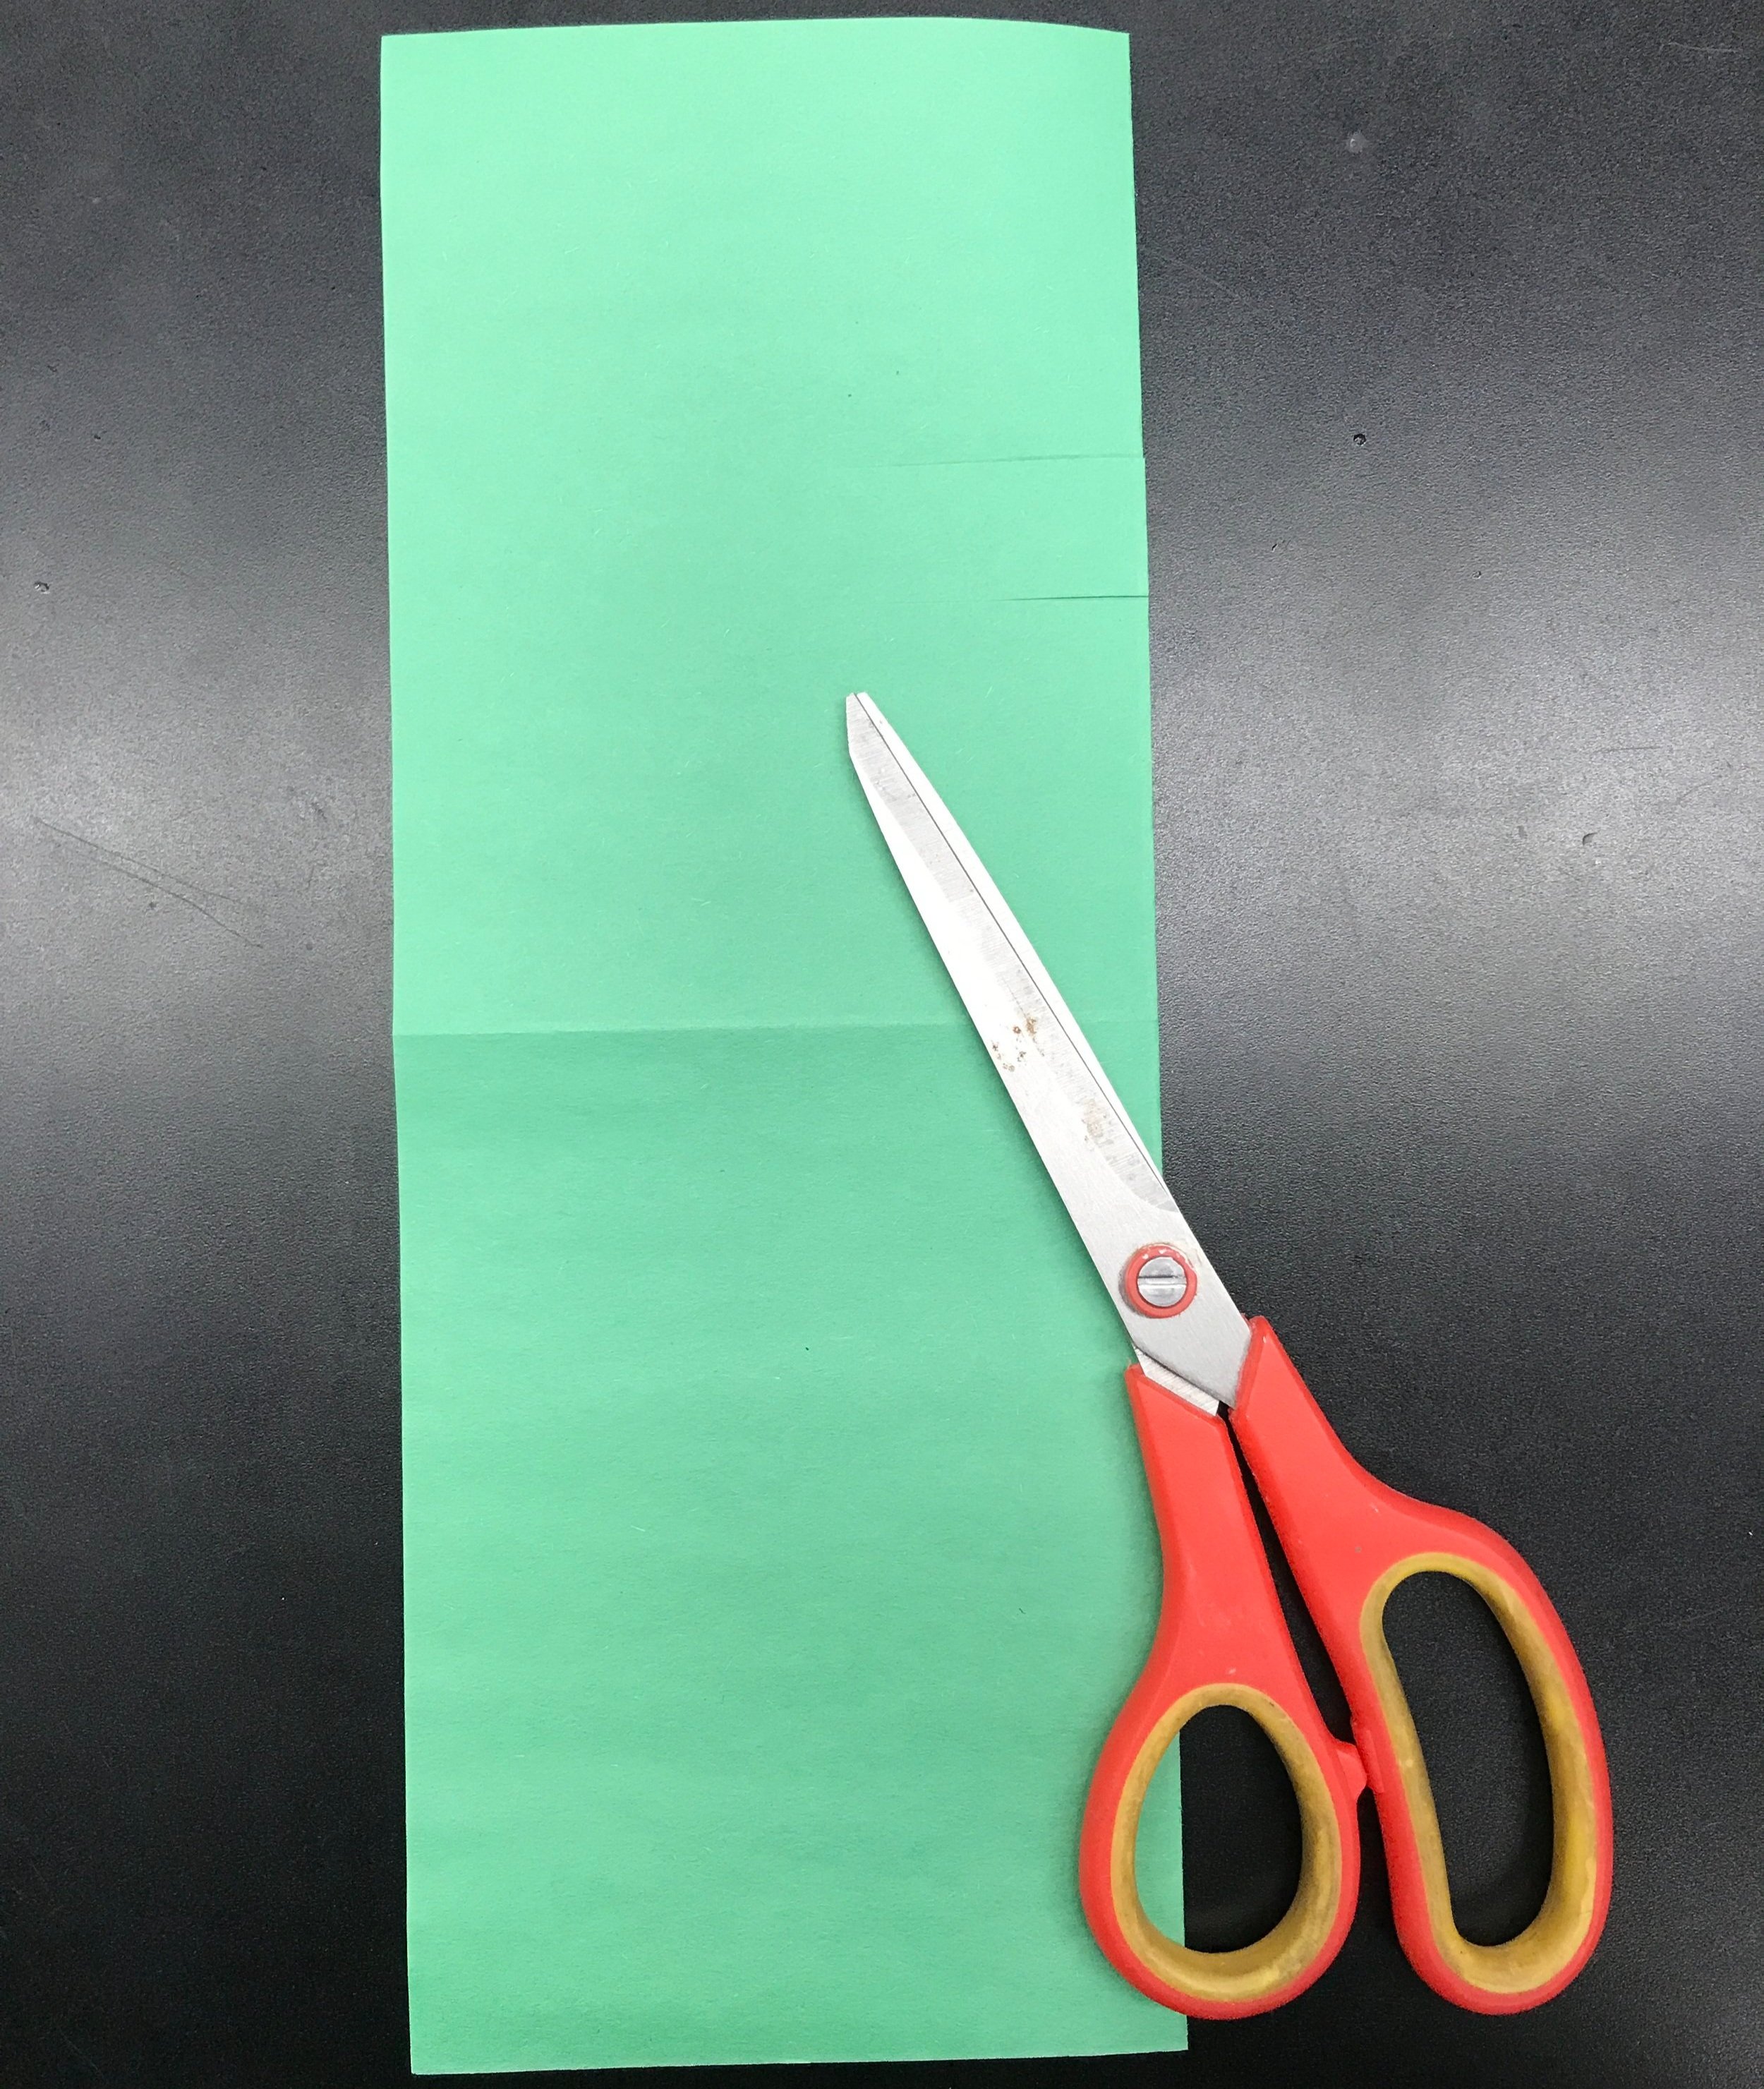
Step Three: Choose a spot along the crease on the right edge of your folded paper to create your pop-up. The closer to the center horizontal crease you make the pop up, the closer it will be to the top of the card when you’re done. Make two equally-sized cuts about half an inch apart and perpendicular to the folded edge. Cut only to the middle of the card.


Step Four: Unfold your paper, and re-fold back into quarters like in step one, this time with the cuts you made on the inside. 


Step Five: Position the card so that it opens with the folded edge at the top. The ends that meet at the bottom help the card stand up when it’s done, so it can be displayed!


Step Six: On another sheet of paper, draw and cut out something to pop out of the card! It can be as simple as a heart, or something more elaborate like a superhero! If you need ideas, think about what the person the card is for would be most excited to see pop out.


Step Seven: Using your glue stick, apply a little glue to only the strip you cut, and stick your cut-out to the strip. 


Step Eight: Pull the strip forward while closing the card, and when you open the card again it will pop out of the card!


Step Nine: Using your crayons and pencil or other decorative materials, write a note to the person your card is for, and decorate any way you want! 

Keep Exploring

  • How could you make multiple pop-ups in one card?

  • What other occasions can you make pop-up cards for?

  • Don’t forget to give your card to the person you made it for! How did it make them feel to receive a handmade card from you?

Share your artwork with us by using @walkerartcenter and #walkerartcenter on social media. Check out #walkerartcenter to see what other families are making!




3D Jellyfish (2nd Grade)

3D Jellyfish (2nd Grade)

Name of Project: 3D Jellyfish 

Grade Level or Age of Participant: 2nd Grade 

School, Teacher and Classroom:

MCAD Teaching Artist:  Lydia Egge

Number of Students: 27 students 

Visual Arts Content or Standards

5.2.2.2.2

5.2.2.3.1

5.2.2.3.2

5.2.2.4.1


5.2.3.6.1 (1. Choose artwork based on a theme or concept for an exhibit.)?


5.2.4.7.1

5.2.4.8.2 (maybe)


Curricular Link / Standards

2009 Minnesota Academic Standards in Science 

2.2.1.1.1

2.2.2.1.2


Overview of Project

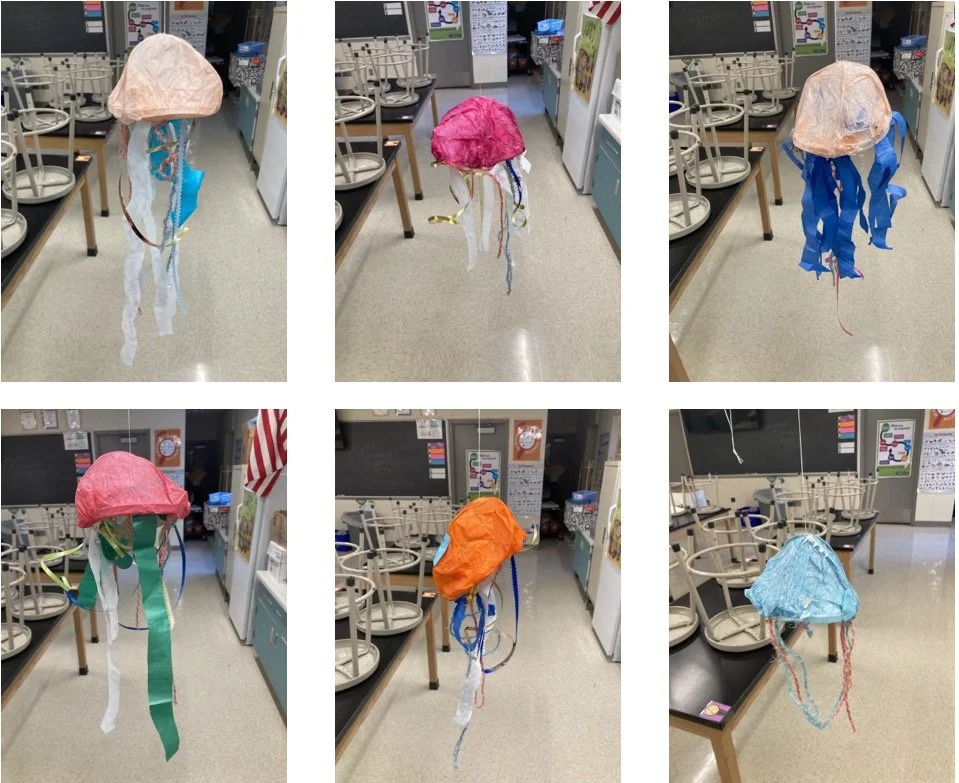
This project will consist of two parts. Part one will be forming the hood of the jellyfish with sculpting metal, tissue paper, and glue. Part 2 will be creating the tentacles using yarn, paper, and ribbon and then attaching the tentacles to the body. 


“Big Ideas”/ Essential QUESTION(s)

What can I do to a material to change its visual properties?

Manipulation of materials. 


Student Outcome Objectives 

Students will:

1. Be able to translate 2d visuals into a 3d representation 

2. Discover through experimentation

3. Visualize or Solve?


Prior Knowledge

No prior knowledge is needed.


Lesson Preparation Timeline

Teaching dates: 1/27/2022 and 2/3/2022

Still planning talking about possible installation dates 


Examples of Artwork

I will bring in examples of what the possible project outcome could be (including one made by a friend of mine that I tested the project on)


Additional Resources

I am planing on showing a video of jellyfish swimming while they work, pictures of real jellyfish, and pictures of jellyfish sculptures. I also am using materials that I have recently been experimenting with on my own. 


Assessment

After the class reflecting on what makes something that’s not moving look like it is or could?

How did certain treatments (like adding water to paper or crumpling up paper) affect a material and how could that affect be useful in translating an idea or visual. 


Materials

Material list:

Ring (deli lids with middle cut out)

Elmers Glue

Sculpting wire

Tissue Paper

Sparkles

Paint brushes 

Plates for glue

Newspaper (for mess)

Blue tape with strings (name tags)

Cardboard box  (carrying everything and potentially ones labeled for each class for drytime)

Water bottle (washing glue paintbrushes)

Paper towels (potential mess)

Yarn

Ribbon

Garbage bags (cut into strips)

Cardstock paper strips (gluing tentacles to this)

Glue sticks (provided by kids..maybe have some extras?)


Kit 1:

Sculpting metal x2

Deli lid x1

Tissue paper squares x2 

Glob of glue on paper plate 

2” Paintbrush 


Kit for Part 2:

Ribbon x2

2 pieces of yarn 

Garbage bag strips x1

Tissue paper strips x1

1” Strip of cardstock paper 


Learning Activities and Timing

Before class starts:

Lay out newspaper, plates with glue, and kits 

  1. Say hello and introduce myself: My name is Lydia and I am currently in school studying furniture design. I work with many different materials including things like: metal, wood, paper, glue, plaster etc and we are going to working with some of those materials today to make jellyfish sculptures.

(remind students to not touch anything yet) 

  1. Open up presentation and introduce the project: We are going to be making 3d jellyfish sculptures

  2. Show some examples of 3d jellyfish sculptures

  3. Talk about the basic Jellyfish parts (the ones we will be making in the sculpture)

Jellyfish parts:

- The hood (or bell) is what encloses the internal structure of the jellyfish

- Tentacles are covered with cells called “cnidocytes” that can stings and kill other animals

- Oral arms are also coated in a venomous cell (nematocysts). The oral arms are closer to the mouth and body of the jellyfish and and are used to draw food up to their mouths

6.  Show photos of real jellyfish 

-What do you notice in the photos? How would you describe them? Ask 2 students to share words. (Repeat for jellyfish sculptures) 

Ask: “How would you describe the differences between the real and fake jellyfish? 

1:20

7. Explain the project briefly (overview)

8. Tutorial 1:

- on bending wire and wrapping it

- applying glue and tissue paper (remind them that this is tricky and if you feel frustrated to take a deep breath and try again or ask for help)

1:25

10. Play video of jellyfish on big screen while the kids work 

11. Walk around and help 

1:35

12. Once ready for step 2 have everyone stop working and listen to Tutorial 2

-show to attach tentacles to cardstock 

-show different techniques for manipulating material

1:40

13. Talk about materials they could find and use at home to add to their jellyfish

14. Final step attaching tentacles  (If we run out of time students who don’t get to the step leave them and I will do it after class)

1:55

15. Reflect:

Share one choice you made for your 3D jellyfish. (did you crumple the tissue paper? Did cut things short or keep them long? Did you use all of your materials or only a few?)

Plant Portraiture

Plant Portraiture

Center School x MCAD Lesson Plan Nature Portraiture 

Grade: 7th - 11th Grade 

Standard

  • Code: 9.1.2.5.1

  • Strand: 1. Artistic Foundations

  • Anchor Standard: Integrate the characteristics of the tools, materials and techniques of a selected media in original artworks to support artistic purposes.


First Day - Drawing

Overview:

  • Students will be working from life - pulling from nature based content to learn observation and slowing down within creating. They will learn the basics of measuring from life as well as linear drawing techniques. 

Big Ideas:

  • How/what do you observe to make art?

  • Exercising eyes and creativity of recreating in art. 

  • Using line to show depth and weight as opposed to shadows 


Student Outcomes 

  • Students will learn how to use measuring tools such as the relationary measuring of one object to another and pencil to eye gauging

  • Learn how to expand upon merely the visual, with using artistic licenses by picking what adds and hurts the composition

  • Learn how to use line to recreate life 

  • Students will learn how to slow down within the process to better understand the subject and give confident line within creating 


Prior Knowledge

  • Assess at the very beginning what are some experiences they have had before with drawing - assess how much I should get into the basics - assume I will have to start from the beginning

  • Prior knowledge of simple drawing and watercolor would benefit students but is not necessary 

Examples of Artwork

         Assessment

Once everyone is finished, everyone will walk around and see everyones creations. 

After everyone is seated - I will ask them to talk in groups, right on the wall some questions for each of the students to answer - after that we will come together as a whole class and can talk about the process and what each group had to say. See if they are excited about painting over them the next day - 

Some questions to put on the board or have as sheets to give to each group 

  • Have each student spend at least 5 minutes talking about their drawing

    • Composition

    • Line

    • Content

    • The process with line and observation 

    • Frustrations and excitements

    • Future painting 

After they all answer we will come together as a whole class and see if anyone has any observations from the project being in the middle - 

Materials

  • Plants or flowers 

  • Pencils H - B

  • Erasers

  • Sharpeners 

  • Drawing paper - maybe just 9” x 12” 

  • Enough paper for practice sheets - sketch/warm up

Learning activities and timing

Class 

( 90 minutes overall)

  • Introduce Myself - (1 minute) 

    • My name, pronouns 

    • Mention MCAD, state a couple little facts about my own practice, mention that we will be diving into some nature portraits :)

  • Have everyone go around the room say their name, pronouns, favorite medium, and favorite snack food (7 minutes)

  • Introduce the activity (10 minute)

    • Show the example and point out our lovely models for the day - plants

    • Bring out the material and show the steps that we will be going through with a little demonstrations fully 7 minutes be sure to assure we will give the steps after the demonstration 

      • Start with looking, describing what composition I want to create (define) 

      • using your fingers to create a rectangle - pick composition

      • First go in with a gesture of the portrait H pencil - plants have life lets be sure to give it that life. Be able to see the full piece right away  

      • Show how to measure with the pencil 

        • Arm stretched out - finger to the point of measure in front - one eye closed - then bring it to paper mark 

      • Start putting and revising - show how the gell eraser works 

      • Revise gesture with measurements and lines  using one point and measuring out

        • Introduce line weight, density, light to dark, weight at the bottom of the portrait 

      • This is where style and decisions of the arts comes into play

  • Then I will have them go to their chairs and start the process!! (45 minutes overall)

  • Review the steps - give a project  sheet for reminders 

    • Start with looking for 2 minutes, using your fingers to create a rectangle - pick composition

    • Move the seat to their liking aren't bound by any prior decisions 

    • First go in with a gesture (3 minutes) of the portrait H pencil - show in the air how quick it should be and to not be scared!! It should look like a scribble, instantly seeing the piece :)plants have life let's be sure to give it that life. Be able to see the full piece right away should be quick  

    • Measure and revise (20 minutes)

    • Start to add decisions that clean up the drawing (10 minutes) 

    • Make some decisions that aren't necessarily front of you (10 minutes) that make the drawing have more of the essence 

    • Wrap up any loose ends for the painting the next day

  • Reflection (20 minute) 

    • Have everyone walk around the classroom 2 minutes

    • Get into groups and have each individual get 5 minutes to discuss their work to their group  

    • What did they learn? What will they take away and what will they leave? 

    • After the groups are finished we will come together as a whole class and have each group say something about their projects !

  • (5 minute) of cleanup 

  • Ask students to as a group put away all the material place it back in compartments

    • Material

    • Write name on back of drawings

  • While they clean up I will gather all the art work for the next days painting  

    • Have a portfolio prepared

Second Day - Painting

Overview:

Students will be working from life - pulling from nature based content to learn observation and slowing down within creating. They will learn the basics of color, mixing, brushes etc 

Big Ideas:

  • How/what do you observe to make art?

  • Exercising eyes and creativity of recreating in art. 

  • Using color to express the content 

Student Outcomes 

  • Students will learn how to use Water color swatching 

  • Learn how to know when to stop with watercolor  

  • Learn how add paint on top of a previous drawing  

  • Students will learn how to slow down within the process of creating 

Prior Knowledge

  • Prior knowledge of watercolor would benefit students but is not necessary 

Examples of Artwork

Assessment

Once everyone is finished, everyone will walk around and see everyones creations. 

Ask if anyone has any observations from the past two days

Materials

  • Plants or flowers 

  • Watercolor palettes paper plates

  • brushes

  • Newsprint  

  • Previous drawing and paper for new people 

Learning activities and timing

Class 

( 30 minutes to 45 minutes overall)

  • Introduce myself to the new students 

  • Have everyone go around the room and say name and pronouns and favorite part of the tour (5 minutes)

  • Introduce the activity (3 minute)

    • Show the water color example and point to the already prepared set up of all the previously drawn works 

    • Show the steps with a quick demonstration that we will be going through (5 minutes) 

      •  Start with looking again this time you are focusing on color shifts and value

      • Lets Start with some gestural swatches of color - light to dark so you don't overwork 

      • Make sure to warn-  not to wet or harsh with the brush - show example

      • While demonstrating describe some things to observe and attempt to achieve in the drawing

        • Darker in shadows - lighter closer to the source of light this will show depth 

        • Overlaying the color with another 

        • Dry brush versus wet on wet 

        • Try putting water down before you add color that will control where the wet on wet will go 

        • You can achieve line with paint as well!! 

        • WIth water color you can’t add light on top of dark, so work from light to dark

      • Really emphasize not going over and over the color, just do one stroke of color done-

      • Then I will have them go to their chairs and start the process!! (18 minutes overall)

    • First go in with lightest highlights first - try not to stray from original drawing think of it as a coloring book  

    • Then local color

    • Leave shadow 

    • Advise to leave some color open to the paper

  • Reflection ( 5 minute) 

    • Have everyone walk around the classroom 2 minutes

    • Ask some questions about the project for student observations

      • How did you guys try to replicate your plants with this medium? 

      • What was your favoirte part of this process? 

      • What would you do differently next time?

      • Would you do this again? 

  • (5 minute) of cleanup 

  • Ask students to as a group put away all the material place it back in compartments

    • Dump water in the sink 

    • Leave brushes to clean at the sink for after

Yayoi Kusama Paper Sculpture Flowers

Yayoi Kusama Paper Sculpture Flowers

Name of Project: Yayoi Kusama Paper Sculpture Flowers

Grade Level or Age of Participant: Ages 5-11

School, Teacher and Classroom: Minneapolis Institute of Arts, Family Day - May 8th, Supervisor - Victoria Myers

MCAD Teaching Artist: Natalie Vilter 

Number of Students: ~400


VISUAL ARTS CONTENT OR STANDARDS

 5.1.2.3.1 Visual Arts 

Grade 1: Create original artistic work 

1. Identify and use symbols when creating art

5.1.2.3.2 Visual Arts 

Grade 1: Create original artistic work 

2. Practice safe use of art materials and tools while making art


OVERVIEW OF PROJECT

Students will create their own flower paper sculptures inspired by Yayoi Kusama’s flower sculptures. Students will also use various techniques to make paper into a three dimensional form.


“BIG IDEAS”/ ESSENTIAL QUESTION(S)

How can one use paper, a 2-dimensional object, to create a 3-dimensional sculpture using a series of techniques?

What do you think are important features of a flower and what shapes do these features take in your mind?

STUDENT OUTCOME OBJECTIVES

Students will:

  • Recall the contemporary artist, Yayoi Kusama, and her art practice

  • Compare Yayoi Kusama’s flowers to their own idea of a flower and visualize important features of a flower

  • Construct their own three dimensional flower using paper

  • Explore various techniques to give their flower texture and stand


PRIOR KNOWLEDGE

  • Know basic features of a flower

  • Using a glue stick and scissors

LESSON PREPARATION TIMELINE

  1. Create art example

  2. Write out a lesson plan and short bio about Yayoi Kusama’s work

  3. Create a visual of various techniques to use for a paper sculpture (example shown below)

Visual of Paper Techniques

  1. Meeting with Victoria Myers about revisions to lesson plan

  2. Revisions to lesson plan

  3. Ordering materials

  4. Cut stips of colored paper that are a variety of 0.5 and 1 inch thick

  5. May 8th - Set up for the event 

  6. May 8th - teach for the event

  7. May 8th - take down the event and put away extra supplies


EXAMPLES OF ARTWORK

Paper Sculpture Example

Up Close Example


ADDITIONAL RESOURCES

Yayoi Kusama, Flowers that Bloom Tomorrow (L), FRP, metal, and urethane paint, 2010

https://www.victoria-miro.com/artists/31-yayoi-kusama/works/artworks13475/

Yayoi Kusama, Flowers that Bloom Tomorrow (L), FRP, metal, and urethane paint, 2010

https://www.victoria-miro.com/exhibitions/411/works/96bbb645b1a41a/

ASSESSMENT

The outcome will be successful if the students are able to use basic shapes to create a flower, real or imaginary. Students will see their own success, if they were able to make their flower three-dimensional using various paper sculpture techniques. 


MATERIALS

  • 8” x 6.5” brown paper bag

  • Scissors

  • Ruler

  • Pencil

  • Eraser

  • Pencil sharpener

  • Gluestick

  • Hole Puncher

  • Assorted colors of construction paper that are 0.5” to 1” thick

  • A table for participants to work on

  • Stapler and staples 

LEARNING ACTIVITIES AND TIMING

  1.  Greet incoming participants and ask if they would like to create a paper flower sculpture (5 minutes)

    1. Explain it’s inspired by Yayoi Kusama’s flower sculptures

      1. Explain that Yayoi Kusama is a Japanese contemporary artist who creates a variety of artwork from performances, sculptures, installations, and paintings. She’s known for coating her artwork in polka dots, which has given her the nickname, “The Princess of Polka Dots”. 

      2. Point out the abstract form, but still has features that make it identifiable as a flower

      3. Point out the curves and polka dots on the flowers 

  2.  Give participants a paper bag and scissors. Participants will disassemble the paper bag by removing the entirety of the twine and cutting a slit vertically down the bag until they reach the bottom of the bag. Students will then cut off the entire bottom part of the bag. Students will then unfold the bag, so it becomes one long strip (7 minutes)

  3. Students will then take the long strip and fold it cleanly in half. Then using a glue stick, students unfold the bag, coat the bag in glue and refold the bag. Participants will push down on the bag to make sure the sides stick together. (3 minutes)

    1. NOTE: recommend that they coat the edges of the bag in glue and create a large “X” in the center of the bag with glue

    2. This will be the base for their flower sculpture. 

  4. Pull out a visual of the various techniques students can use for their paper sculpture. (1 minute)

  5. Ask participants what makes a flower identifiable as a flower (1 minute)

  6. Hand out various colors of paper, gluesticks, and scissors for participants to start assembling their flowers. (1 minute)

  7. Students will begin to assemble their flowers. TA will offer guidance when the participant asks. (17 minutes)

  8. Offer hole punch and foam stickers to decorate the base and flower. (5 minutes)


TEACHING ARTIST REFLECTION

  • Depending on the age of the participants, they might have difficulty disassembling the bag with no tears. The teacher and volunteers will be there to help disassemble the bag. 

  • Participants might have difficulty using the glue stick and patiently holding down objects so they stick. Staplers will be provided just in case. 

  • Family Day at the MIA is a public event, so others will be able to see their finished product as they walk through the MIA. 

  • The teacher will receive feedback based on participants' enthusiasm for the project. 

Art of Communication

Art of Communication

Name of Project: Art of Communication

Grade Level or Age of Participant: Ages 5 and up

School, Teacher and Classroom: Friends for 100 Years: A Lasting Legacy - Park Events throughout the summer taught by MIA artists

MCAD Teaching Artist: on staff MIA teaching artists

Number of Students: ~2000 throughout the summer

VISUAL ARTS CONTENT OR STANDARDS

K-3 1. Artistic Foundations 

1. Demonstrate knowledge of the foundations of the arts area. 

Visual Arts 0.1.1.5.1 1. Identify the elements of visual art including color, line, shape, texture and space. 

K-3 2. Artistic Process: Create or Make 

1. Create or make in a variety of contexts in the arts area using the artistic foundations. 

Visual Arts 0.2.1.5.1 1. Create original two- and three- dimensional artworks to express ideas, experiences or stories. 


K-3 2. Artistic Process: Create or Make 

1. Create or make in a variety of contexts in the arts area using the artistic foundations. 

Visual Arts 0.2.1.5.2 2. Revise an artwork based on the feedback of others. 


CURRICULAR LINK / STANDARDS

01155 Communications 

Courses in this classification focus on the application of oral and written communication skills through a variety of formal and informal experiences. They emphasize developing effective interpersonal skills and may include team-building components. How interpersonal communications are affected by stereotypes, nonverbal cues, vocabulary and stylistic choices may be included.


OVERVIEW OF PROJECT

Participants will create a work inspired by Speech by Saul Steinberg (1959), exhibited in the MIA. On a postcard, participants will depict a conversation they had with a friend in the form of shapes, lines, and color in either a representational or abstract style. They can then send the postcard to a loved one. 


“BIG IDEAS”/ ESSENTIAL QUESTION(S)

  • What ways of communication work best for you? Is it by talking? Dancing? Drawing? 

  • How do line, shape, and color affect the tone of an artwork?


STUDENT OUTCOME OBJECTIVES

Students will:

  1. Create a postcard using linework, shape, and color to express themselves

  2. Evaluate how linework, shape, and color give a certain tone to their artwork.

  3. Analyze what forms of communication work best for them

  4. Understand that everyone has a different form of communication and expression, which could cause misunderstandings or confusion between people.


PRIOR KNOWLEDGE

  • Basic motor skills for using a pencil

  • Basic communication in any form (verbal, expressions, body language, etc)


LESSON PREPARATION TIMELINE

  • Map out lesson plan

  • Create artwork example

  • Meeting with Aki Shibata about revisions

  • Revisions to lesson plan

  • Meeting with Krista Pearson about revisions

  • Revisions to lesson plan

  • Collect materials 


EXAMPLES OF ARTWORK

https://collections.artsmia.org/art/129764/speech-saul-steinberg

Saul Steinberg, Speech, Ink, graphite, conté crayon, and rubber stamp on paper, 1959

Teacher Example

ASSESSMENT

Students will be able to see their own success by being able to identify how they best communicate with others and how a conversation could be interpreted using line, shape, and color.  This can come from reflection through the process of creating their artwork or seeing the finished product.


MATERIALS

~$1- 3 each

  • Postcard Sized Cardstock Paper

  • Pencils

  • Colored Pencils

  • Eraser

  • Stamp

  • Table for participants to work on 


LEARNING ACTIVITIES AND TIMING

  1. TA will greet people who walk past and ask if they would like to make a postcard. (1 minute)

  2. TA will explain to the participant that they will express a conversation they had with a friend on a postcard with pencils and colored pencils. It can be representational or it can be abstract. There will be a few print outs of Saul Steinberg’s example for inspiration. The TA can show how the piece is represented with the use of people opening their mouths as if in a conversation, while also showing the abstractness of the way the speech bubbles are formed. The TA will encourage the participants to think about the mood of their overall conversation. Was it happy and exciting? Was it a form of comfort? They will encourage the participant to use colors and shapes they think best help to show the conversation. (3 minutes)

  3. TA will then give them a postcard and drawing utensils. (1 minute)

  4. Participants will then be able to draw on only one side of the postcard. The participants can sketch out their idea lightly with a pencil or they can start drawing right away. (15 minutes)

  5. Once the participant is finished, they can show the TA their postcard 1 by 1 if they so choose and describe the conversation they drew. (1 minute)

  6. TA will ask if they would like to leave the postcard with them, so it can be showcased at the MIA on the first floor. 

  7. If the participant wants to keep it, the TA can offer a stamp so the participant can address and mail their postcard right away. (1 minute)


TEACHING ARTIST REFLECTION

  • This project fits into the communication curriculum because the participant is actively thinking about the tone of a conversation they had. They can reflect on how some people would not understand their conversation based on different interpretations and social cues. 

  • Participants will be able to mail their postcard to a loved one, sharing it with the community. 

  • Feedback will be received by how enthusiastic the students are about creating their postcard.

Art Buddies Craft #2

Name of Craft: Mosaic Stained Glass Hanging 


Objectives: To design a craft for elementary students that prioritizes them using their imagination to create, while being appropriately complex for their age range.


Overview of the craft: The students will take a thin piece of clear film, and glue little torn pieces of colored tissue paper onto it, creating a dappled look. Then, a piece of string will be tied through the two punched holes and the ‘stained glass’ can be hung in a window, letting light pass through and illuminating the colors.


Student Outcomes: I want students to enjoy working with their hands, and experiment with different colors on the project. The process of ripping up and pasting tissue paper is a lot more tactile and freeform than the other craft, which adds variety.


Research and resources: I looked to Pinterest and Google like the other crafts. I needed to replace the origami craft because it was too difficult to do for the students, so I looked for a way they could use paper and light in an interesting way.


Materials: Tissue paper, glue, transparent film, yarn


Art Buddies Craft #1

Name of the craft: ‘Exquisite Buddy’

Objectives: To design a craft for elementary students that prioritizes them using their imagination to create, while being appropriately complex for their age range.


Overview of the craft: The craft is an imaginary made-up animal made from different pieces of cut up paper. Students will follow the instructions to cut out different shapes, not knowing what parts of the creature the shapes correlate to. At different points the students will trade some of the shapes with each other, adding to the randomness of their results. The end of the instructions tells them which parts of the animal are which, and they then glue all the pieces together to create their imaginary beast. The students can then give it a funny name, and draw on specific details like a tail or a face, in whatever way they like.


Student outcomes: I want students to enjoy the act of creation with a project that they don’t have full control over, and without an idea of how it’s supposed to look when its finished. The random element of the craft is what makes it fun, and students will come away from the craft with an appreciation for not always going into art with a specific desired outcome in mind.


Research and resources: I wanted to come up with a craft that felt original, so in my research for fun crafts, I didn’t want to lean in too closely to any of the ones that I found. Google and Pinterest came in handy for inspiration. The idea around this craft comes from the concept of the ‘exquisite corpse’, which is a drawing brought together by multiple people without knowing what the other parts look like. I also knew this craft had to be made with materials that wouldn’t make much of a mess, so that did influence what I came up with.


Materials: Construction paper, scissors, glue, pencils, googly eyes, letter stickers.


Learning activities: Following instructions, cutting out shapes with paper, appropriately using crafting supplies


Character Creation Program #4 - Back/Middle/Foreground

Character Creation Program #4 - Back/Middle/Foreground

Name of Project: Character Creation Program - Perspective/Lair

Grade Level or Age of Participant: Students age 8-11

MCAD Teaching Artist:  Kristina Wacker

OVERVIEW OF PROJECT

Character Creation Program

“Our mentors and students work together to create a one-of-a-kind character and costume based on the child’s imagination and values — along the way, we spark imagination and build confidence. With the help and guidance from their creative mentors, kids are able to explore their creativity and build something more ambitious than they ever thought possible.”

In-person program/Hybrid

  • Connect with your buddy for 1 hour every week for a period of 8 - 10 weeks

  • Create a character and costume using our huge collection of art supplies 

  • Celebrate your creation & participate in a costume parade, presentation, and professional photoshoot

Students will also: 

  • Learn skills and elements of illustration, including the use of color, shape, mark-making, and fore/middle/background

  • Learn more about creative careers from visiting artists


“BIG IDEAS”/ ESSENTIAL QUESTION(S)

Students will, over the duration of the course, build their confidence and explore their creativity through the creation of their super buddy characters and costumes.


STUDENT OUTCOME OBJECTIVES 

Students will:

  1. Distinguish between the foreground, middle ground, and background

  2. Use their knowledge of fore/mid/background to build a landscape/lair with depth

  3. Create a poster using a combination of the skills they have learned throughout this program


ADDITIONAL RESOURCES

[Lesson Timeline]


CHECKING-IN TO STUDENTS UNDERSTANDING

Students will demonstrate their knowledge of the concepts and skills taught throughout the program by using them when creating their final poster.


MATERIALS

  • Buddybook

  • Large paper to create poster

  • Smaller paper to sketch on

  • Crayons

  • Markers

  • Colored Pencils

  • Fabric

  • Tape

  • Scissors

  • Staplers

  • Hot glue guns, glue sticks

  • Ribbon

  • Pipe Cleaners

  • Construction paper

  • Popsicle sticks

  • Pom poms

  • Fake floral items

  • Cardboard

  • Miscellaneous plastic items (bottle caps, googly eyes, etc.)


LEARNING ACTIVITIES AND TIMING

  1. Greeting

    1. “Hey, good morning/afternoon, how are you all doing today?” etc

  2. Lesson (15-20 min)

    1. Foreground, middleground, background definitions (+example)

      1. How to make something part of these perspectives

      2. How to use these to make a space seem more 3D

  3. Students work time with mentor

    1. Student focus on thinking about how they can use what they’ve learned so far to show the answers to questions about their lair/scene

      1. Where lair is, can they use any skills they’ve learned in previous sessions to show this? (ex: color, mark-making)

      2. What is one thing in the background of your lair? One thing in the middle ground? One thing in the foreground? 

      3. Any decorations? Can you tie it to your hero’s powers/likes/backstory?

      4. Where is the super buddy placed?

  4. Virtual check in time (10 min)

    1. Ask about work, if there’s anything the student would like to share about it/how they used what they learned today?

    2. Students respond ____

  5. Wrapping up / Closing - Sharing Circle 

    1. Students will all say one word about lesson

    2. Share one thing they put in their lair

    3. Walk around to see what everyone made maybe?

etc.

Download support materials here:

Character Creation Program #3 - Markmaking

Character Creation Program #3 - Markmaking

Name of Project: Character Creation Program - Mark-Making

Grade Level or Age of Participant: Students age 8-11

MCAD Teaching Artist:  Kristina Wacker


OVERVIEW OF PROJECT

Character Creation Program

“Our mentors and students work together to create a one-of-a-kind character and costume based on the child’s imagination and values — along the way, we spark imagination and build confidence. With the help and guidance from their creative mentors, kids are able to explore their creativity and build something more ambitious than they ever thought possible.”

In-person program/Hybrid

  • Connect with your buddy for 1 hour every week for a period of 8 - 10 weeks

  • Create a character and costume using our huge collection of art supplies 

  • Celebrate your creation & participate in a costume parade, presentation, and professional photoshoot

Students will also: 

  • Learn skills and elements of illustration, including the use of color, shape, mark-making, and fore/middle/background

  • Learn more about creative careers from visiting artists


“BIG IDEAS”/ ESSENTIAL QUESTION(S)

Students will, over the duration of the course, build their confidence and explore their creativity through the creation of their super buddy characters and costumes.


STUDENT OUTCOME OBJECTIVES 

Students will:

  1. Learn the use of mark making to create texture and pattern

  2. Create their own marks/patterns to use

  3. Incorporate mark-making into their costume and lair 


ADDITIONAL RESOURCES

[Lesson Timeline]


CHECKING-IN TO STUDENTS UNDERSTANDING

Students write down/explain what marks they used, and how the marks create or emulate texture in their costume/lair


MATERIALS

  • Buddybook

  • Mark-making Worksheet

  • Crayons

  • Markers

  • Colored Pencils

  • Fabric

  • Tape

  • Scissors

  • Staplers

  • Hot glue guns, glue sticks

  • Ribbon

  • Pipe Cleaners

  • Construction paper

  • Popsicle sticks

  • Pom poms

  • Fake floral items

  • Cardboard

  • Miscellaneous plastic items (bottle caps, googly eyes, etc.)


LEARNING ACTIVITIES AND TIMING

  1. Lesson (15-20 min)

  1. What is mark making?

    1. Way to use line and marks to create texture and pattern

    2. Examples of mark making

      1. Specifically, how it can be used to illustrate different materials

  2. Pass out mark making sheets for students to fill out

  3. Students work time with their mentor

    1. Student focus on thinking about how they can use marks to create texture on their costume

    2. Goal is to use one type of mark into the costume design

  4. Virtual check in time (__ min)

    1. Ask “-_________” 

    2. Students respond ____


  5. Wrapping up / Closing  - Sharing Circle

    1. Students will all say one word about lesson

    2. Share one mark they used and how they used it

etc.

Download support materials here:

Character Creation Program #2 - Shape/Logo

Character Creation Program #2 - Shape/Logo

Name of Project: Character Creation Program - Shape/Logo

Grade Level or Age of Participant: Students age 8-11

MCAD Teaching Artist:  Kristina Wacker


OVERVIEW OF PROJECT

Character Creation Program

“Our mentors and students work together to create a one-of-a-kind character and costume based on the child’s imagination and values — along the way, we spark imagination and build confidence. With the help and guidance from their creative mentors, kids are able to explore their creativity and build something more ambitious than they ever thought possible.”

In-person program/Hybrid

  • Connect with your buddy for 1 hour every week for a period of 8 - 10 weeks

  • Create a character and costume using our huge collection of art supplies 

  • Celebrate your creation & participate in a costume parade, presentation, and professional photoshoot

Students will also: 

  • Learn skills and elements of illustration, including the use of color, shape, mark-making, and fore/middle/background

  • Learn more about creative careers from visiting artists


“BIG IDEAS”/ ESSENTIAL QUESTION(S)

Students will, over the duration of the course, build their confidence and explore their creativity through the creation of their super buddy characters and costumes.


STUDENT OUTCOME OBJECTIVES 

Students will:

  1. Learn the symbolism behind different shapes

  2. Learn how to construct complex shapes out of simpler ones

  3. Use shapes to create a logo for their super buddy

ADDITIONAL RESOURCES

[Lesson Timeline]


CHECKING-IN TO STUDENTS UNDERSTANDING

Students write down/explain what shape they used in their logos, and why/how they used those shapes.


MATERIALS

  • Buddybook

  • Shape Worksheet

  • Large pieces of cardboard or cardstock to make badge

  • Crayons

  • Markers

  • Colored Pencils

  • Fabric

  • Tape

  • Scissors

  • Staplers

  • Hot glue guns, glue sticks

  • Ribbon

  • Pipe Cleaners

  • Construction paper

  • Popsicle sticks

  • Pom poms

  • Fake floral items

  • Cardboard

  • Miscellaneous plastic items (bottle caps, googly eyes, etc.)


LEARNING ACTIVITIES AND TIMING

  1. Greeting

  2. Lesson (15-20 min)

  1. Ask intro questions

    1. “What are some shapes?”

    2. “What do you think of when you see [shape]?”

  2. Shape meanings

    1. Regular vs irregular shapes

    2. Specific shape symbolism (ex: squares sturdy, circles protective (shields), etc)

  3. Breaking down complex shapes into simple ones

    1. How to use simple shapes to make complex ones (ex, cat out of half circles, bat out of crescents, etc)

  1. Students work time their mentor (__ min)

    1. Student focus on thinking about: 

      1. How to make the logo represent their character/what it says about them

        1. Using color, shapes and the meaning behind them

  2. Virtual check in time (__ min)

    1. Ask about work, if there’s anything the student would like to share about it/how they used what they learned today?

      1. What shapes students used? Why? 

    2. Students respond ____

  3. Wrapping up / Closing  - Sharing Circle

    1. Students will all say one word about the lesson

    2. Share a shape they used in their logos

etc.

Download support materials here:

Character Creation Program #1 - Color

Character Creation Program #1 - Color

Name of Project: Character Creation Program - Color

Grade Level or Age of Participant: Students age 8-11

MCAD Teaching Artist:  Kristina Wacker


OVERVIEW OF PROJECT

Character Creation Program

“Our mentors and students work together to create a one-of-a-kind character and costume based on the child’s imagination and values — along the way, we spark imagination and build confidence. With the help and guidance from their creative mentors, kids are able to explore their creativity and build something more ambitious than they ever thought possible.”

In-person program/Hybrid

  • Connect with your buddy for 1 hour every week for a period of 8 - 10 weeks

  • Create a character and costume using our huge collection of art supplies 

  • Celebrate your creation & participate in a costume parade, presentation, and professional photoshoot

Students will also: 

  • Learn skills and elements of illustration, including the use of color, shape, mark-making, and fore/middle/background

  • Learn more about creative careers from visiting artists


“BIG IDEAS”/ ESSENTIAL QUESTION(S)

Students will, over the duration of the course, build their confidence and explore their creativity through the creation of their super buddy characters and costumes.


STUDENT OUTCOME OBJECTIVES 

Students will:

  1. Learn about the color wheel, color symbolism, and types of color pairings

  2. Demonstrate understanding of color theory through color choice in their costume designs

  3. Explain what colors they used in their costume and why


ADDITIONAL RESOURCES

[Color Theory Doc]

[Lesson Timeline]


CHECKING-IN TO STUDENTS UNDERSTANDING

Students write down/explain what colors they picked and why. (E.g. How do the colors they pick connect to their costume/character?)


MATERIALS

  • Buddybook

  • Color Theory Worksheet

  • Crayons

  • Markers

  • Colored Pencils

  • Fabric

  • Tape

  • Scissors

  • Staplers

  • Hot glue guns, glue sticks

  • Ribbon

  • Pipe Cleaners

  • Construction paper

  • Popsicle sticks

  • Pom poms

  • Fake floral items

  • Cardboard

  • Miscellaneous plastic items (bottle caps, googly eyes, etc.)


LEARNING ACTIVITIES AND TIMING

  1. Greeting

  2. Lesson (15-20 min)

  1. Intro to types of colors

    1. Primary, secondary, tertiary

    2. Temperature of colors

  2. Symbolism

    1. What colors mean

    2. How color can change meaning

  3. Students work time with mentor 

    1. Student focus on thinking about: 

      1. what colors they’re choosing

      2. why they’re choosing them

      3. How they relate to the character

  4. Virtual check in time (X min)

    1. Ask about work, if there’s anything the student would like to share about it/how they used what they learned today?

      1. What colors they’re using? 

      2. Why they chose the colors they did?

    2. Students respond ____

  5. Wrapping up / Closing - Sharing Circle

    1. Students will all say one word about the lesson

    2. Share favorite color/one color used

etc.

Download support materials here:

Doodle Buddies

Grade Level or Age of Participant: Teenagers (10th-12th grade)

Number of Students: 10-12


OVERVIEW OF PROJECT

Activity should take 15-20 minutes to complete. This is an icebreaker/grounding activity to warm up before shifting attention to major projects. Participants and facilitator will be providing prompts in order to guide this drawing activity. The prompts will be based on the different bodily parts of a character as well as using other words (adjectives, nouns, verbs) to describe the character and scene. 

Everyone will be creating their own separate drawing using the same prompts given during the duration of the activity. Drawings from the group are not revealed until the end of the activity.


“BIG IDEAS”/ ESSENTIAL QUESTION(S)

Through drawing the characters, learners are building visual interpretation skills.

Through drawing, group will be able to get to know each others. 

Adjective to use to inspire drawing (each students will choose adjective):

They will be choosing the adjective of “How would you describe your week?” OR “How are you feeling about the project they are working on?”  

Spiky / Squiggly / Soft / tangle

“How did AAAA thought about spiky? What do you think AAAA was thinking? ”


STUDENT OUTCOME OBJECTIVES 

Students will:

1. Be able to create their own characters by collaborating with words that has provided from the others.  

2. Listen to the others words and providing visual description 

3. Practice interpatient of adjectives with visual components 

4. Present and verbally explain their visual interpretation 


PRIOR KNOWLEDGE

  • Students must know What adjectives are 

  • Students should be able to interoperate Special balance on the limited size paper

  • Students can call out different Body parts


ASSESSMENT

Everyone would have created drawing work to show at the end of the lesson

At the presentation we can discuss the difference and similarity of each other’s work.

“What is your favorite part of your characters?” 

“What is your favorite part of others characters?”

“Is there anything hard to interpreted?” 

“What is the difference between your work and AAAA’s work? OR similarity?”  

MATERIALS

Blank sheet of paper

Drawing utensil (Choose 1 medium)


LEARNING ACTIVITIES AND TIMING

1.Relating to Audience

Take time to explain that the activity will be short in time and that there are no right or wrong answers/outcomes. The effectiveness of the activity is dependent on interpreting the given prompts and the short duration for each prompt. -


2. Collect Materials

-Give students a couple of minutes to collect materials or ask questions about materials needed for activity. 

-Check-in with students before moving on to the next step.

3. Introduction of Activity

The facilitator explains rules and prompts for the grounding activity

-I decided to give this activity the name “Doodle Buddies”

-The main idea of the activity is that we will all be drawing our own ‘doodle buddies’ using the same information/prompts (to make the prompt process easier- body parts, other descriptive words)

-The prompts are mostly based on the different body parts a character could have (head, arms, legs, etc. ) but will also be influenced by the overall chosen theme and descriptions from group members

-I will be assigning the first part of the prompt (body parts) to the group members as they are chosen to contribute, then they will provide more specific details about said body part.

-I will start off to demonstrate the flow of the activity and also keep a timer to move the activity along


4. Questions

- Take time to answer any final pending questions about the “Doodle Buddies” grounding exercise.

-Suggest overall character theme


5. Begin Activity

Before beginning to draw the character’s head, ask group members if they would like to volunteer prompts or ‘popcorn’ to their peers.

-Choose character theme and write in top left corner

-Re-state that after each prompt is given, we will only have 30 seconds to complete that part of the character

-Re-state that the first part of the prompt is given by me (body parts) and the description comes second. - example: body part - arms, spooky themed - skeleton arms/bones, adjective - decayed bones, noun - chainsaws for arms, verb - flexing

-Check-in with students before moving on to the next step.


6. Prompts

- Head and neck

-Eyes/eyebrows

-Nose

-Mouth

-Ears

-Hair/hair accessories 

-Body - include clothing

-Arms

-Legs - include clothing

-Feet/shoes

-Additional accessories - maybe bag or jewelry

-Pet/companion

-Background

-Name of character - Could also collectively create a name with the group instead of assigning one person


7. Final Product Reveal

After everyone in the group has contributed to the prompts, the facilitator will show their final drawing and name their favorite characteristic that their character was given. Discuss with the group about how their doodle buddy turned out.

(7 min) Share out time

- Show facilitator’s drawing as a sample and talk about “My character name is BBB and I name them that because ________ “ This is the way we can introduce the characters to each others.

- invite next speaker by asking “Did anyone found something similar to my character, come forward and introduce your character ☺” 

- Keep going around till everyone introduce and talk about their character! 


(1 min) Reflection and summary for the project “This is what I noticed doing the project with you”

  • Learned about each other a little bit from this project

  • Made visual interpretation from the language 

  • We made collaboration through sharing words

  • All of our interpretations are different

  • Respecting each other’s differences and artistic choices.


Collaborative Line Drawing... With a Twist!

Collaborative Line Drawing... With a Twist!

Whatever it is, the way you tell your story online can make all the difference.

Age of participants: 6+

Mcad teaching artist: Greer Coffman

Number of Students: 7

Overview of Project:

In this project we will come together to create a collaborative blind drawings and explore how to communicate our

goals and intentions with each other, both abstractly and concretely.

Big Ideas:

● clear communication vs abstract communication

● different interpretations of ideas

● individuality

Student Outcome Objectives

Students will:

1. create a collaborative line drawing

2. find ways to communicate with each other to make their points clear

3. have a good time!

Prior Knowledge:

● usage of a mark making tool

● communication skills

lesson preparation timeline:

● planned the lesson

Materials:

● piece of paper

● mark making tool

● google meet software

learning activities and timeline:

1. i will start the lesson by explaining the concept

1. “today we will be creating a collaborative line drawing, one person will start by putting a line on the

paper, and it can be any shape or duration, but as soon as you lift your pencil off the paper, you are

done. you then must describe to the group the line you made and everyone must try and replicate

that line without seeing it. then the next person will go and add on with a line of their own, and

everyone must replicate that line without seeing it, and so on and so forth”

2. I will be the person to start the line drawing, then I will choose someone to do the next line, and then we will

continue in that manner.

3. After we are done with the first round, we will do a second round in which we will try and create something

more grounded, but using more abstract terms. For example, someone will draw a mouse, but instead of

using very specific terms for it, they will be looser with how they describe it, and people can interpret that

how they want.

4. After all of the drawings are complete, we will come together to share and compare our individual interpretations of the prompt!

Collaborative Collage

Collaborative Collage

Name of Project: Collaboration Project

Grade Level or Age of Participant: Adult Artists of All Abilities

School, Teacher and Classroom: MSS MN (Fresh Eye Arts), Analeise Jarvi-Beamer

MCAD Teaching Artist: Casey Grengs

Number of Students: Planned for 9, 3 were present that day.

Visual Arts Content or Standards: Movement, Line, Shape, Color, Mark Making

Overview of Project:

Artists will create individual 2D pieces that will be adhered to a larger sheet of paper. The students can choose to follow the prompt of creating a piece that is inspired by a happy dream they recently had or go off on their own intuition. Artists have the choice if they want to cut their individual pieces into unique shapes or sticking with the original rectangle shape of mixed media paper handed to them. Once each artist is done with their individual pieces they will be able to decide where to place their piece on the larger collective final piece.

“Big Ideas”/ Essential Question(s): What is your creative impulse telling you to make?

Student Outcome Objectives:

Artists will:

  1. Explore the creative, intuitive process

  2. Explore collaborating.

  3. Explore new media and mixed media (optional)

Prior Knowledge: Ability to create marks on paper.

Lesson Preparation Timeline:

  1. Complete rough draft of PBM

  2. Share with Aki and AJ

  3. Revise from feedback received

  4. Gather and drop off materials at site location

  5. Teach lesson

Student Work

student work <3 .jpg


Additional Resources:
23 Collaborative Art Projects That Bring out Everyone’s Creative Side

Teaching with Community

The Art of Collaboration with KeFe | KQED Arts

Collaborative Art with Amy Franceschini | KQED Arts

Assessment:
Did the artist create marks on the provided paper for the individual 2D piece?

Did the artist create thumbnail sketches?

Did the artist decide where to place their individual piece on the collective piece?

Did the artist experiment with materials?

Is there movement in the piece?

What is the mark making like?

What colors did the artist choose?

Materials: Mixed media paper, poster board, glue (optional: pairs of scissors, paint brushes, sketch sheets, pencils, erasers, paint, markers)

Learning Activities and Timing

  1. Hand out materials throughout lesson as artists need

  2. Open with a presentation of examples of collaborative artworks, introduce project (10 minutes)

  3. Artists sketch initial ideas (10 minutes)

  4. Drawing, marking and cutting individual artwork (30 minutes)

  5. Placing, glueing and formatting collective final piece (20 minutes)

  6. Reflection (20 minutes)

Teaching Artist Reflection

Because of my virtual teaching circumstances, I am heavily reliant on AJ to get the physical parts of the project completed.

I hope for this project to open for exploration, but because of its openness and experimental nature, I feel like it might intimidate some artists.

The artists work will be shared virtually on the MCAD TA website.

For feedback, I will ask the artists and AJ at the end of the project how they felt about the experience.


PART 1/3: Paint Collages Inspired by Jack Whitten

PART 1/3: Paint Collages Inspired by Jack Whitten

Name of Project: Paint Collages inspired by Jack Whitten: PART 1/3

Teacher:  Lula

 Age or Grade Level: Prepared for 3rd grade

 Visual Arts Content / Standards

MN Arts Standard 3501.0820 

Subpart 1a - Foundations:

The student will use foundational knowledge and skills while responding to, creating, and presenting artistic work.

Subpart 5b - Connect:

The student will understand that artistic works influence and are influenced by personal, societal, cultural, and historical contexts, including the contributions of Minnesota American Indian tribes and communities. 

National Core Arts Standard:

Relate artistic ideas and works with societal, cultural and historical context to deepen understanding.

Overview of Project

This will be the first part of a 3-part lesson series investigating the life and work of renowned painter Jack Whitten. We will explore his involvement in the Civil Rights movement of the 1960s, his work as an artist in New York City, and his famous break from traditional painting techniques to collage work using hardened paint. 

This week, in Lesson 1, I will present a slideshow to students about Whitten’s life and work, from his childhood to his Black Monolith series. We will look at his works and discuss what emotions we feel when we look at them. We will discuss what larger forms we see, then zoom in and observe what small shapes collage together to comprise the whole painting. We will compare a photograph of Muhammad Ali with Whitten’s portrait of Muhammad Ali to introduce the idea of representation vs. abstraction.

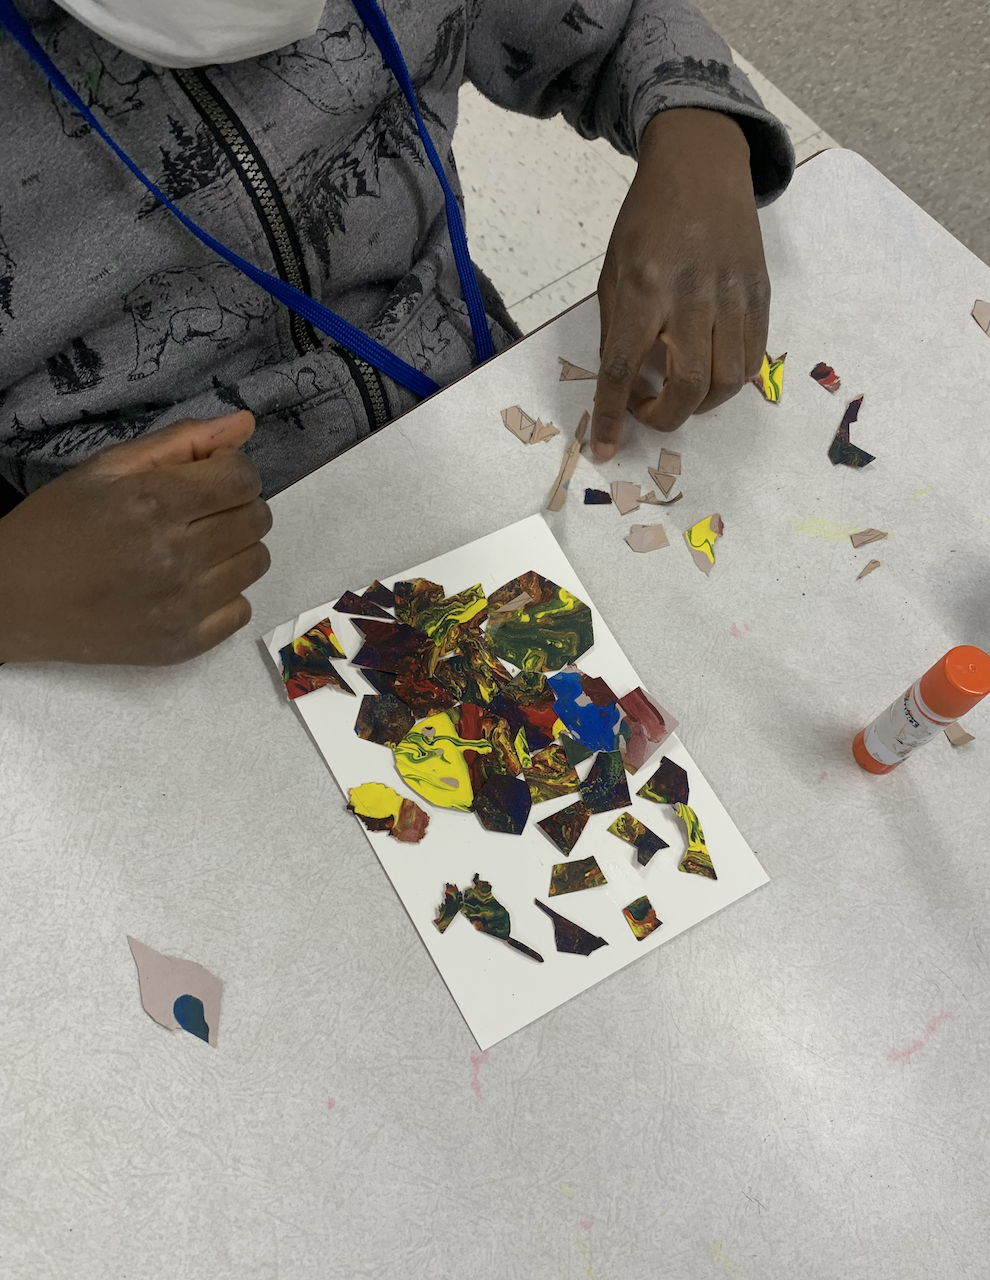
We will create an acrylic pour painting, which will harden over the next two weeks. We will notice the colors we have chosen and how they look next to each other.

“Big Ideas”/ Essential Question(s)

  • How can small shapes make up a big picture? Why do we look for smaller shapes?

  • How is Jack Whitten’s work influenced by his experience fighting for Civil Rights in the 1960s? 

  • What emotions do we feel when seeing and making political work?

  • What happens when we combine colors? How can we create a color-unified composition?

  • What is abstraction? Why do we use it?

Student Outcome Objectives 

Students will:

1. Learn about Jack Whitten’s life and work

2. Be able to explain the difference between abstract work and representational work, and demonstrate understanding of why artists use abstraction.

Prior Knowledge

Students recently were taught about the Civil Rights movement of the 1960s. This will allow us to utilize language like civil rights, racism, segregation, protest and activism to contextualize Jack Whitten’s involvement in the movement and how his work was influenced by growing up in segregated Alabama.

Examples of Artwork

Here is my slideshow with Whitten’s work included, feel free to download and use it:

Assessment

Ask questions like, “What do you feel when you’re making this?” “Where is your mind wandering to while you’re pouring this paint?” “How do these colors make you feel?” to confirm the goal of abstraction as expressing emotions/ideas through art. We will compare Whitten’s abstract work to photographs and students will explain the difference between abstract and representational.

Materials

Large paper for pouring paint onto

Paint ingredients (paint must be prepped ahead of time to marble when it’s poured):

3 parts Acrylic paint, tempera can work too

1 part Elmers Liquid Glue

Isopropyl alcohol to thin the mixture

Cups & Sticks to stir

Teacher Reflection

Word of advice to future educators of this lesson: the paint pour takes longer than expected (I had planned 10 minutes of pouring but it took us almost 30) and you will need more paint mixture than you expect, about a dixie cup full for each child. This is a no-brush painting activity!!! Kids move the paper around to guide the paint. Make sure to have wet wipes ready & ask children to roll up sleeves first.

A stude
Students manuvering the paint around their papers by tilting the paper up and down, side to side.

Students manuvering the paint around their papers by tilting the paper up and down, side to side.

PART 2/3: Paint Collages Inspired by Jack Whitten

PART 2/3: Paint Collages Inspired by Jack Whitten


Planning Backwards Model 

Name of Project: PART 2/3: Paint Collages Inspired by Jack Whitten

 Teacher:  Lula McConnell

 Age or Grade Level: Prepared for 3rd grade

 Visual Arts Content / Standards

MN Arts Standard 3501.0820 

Subpart 1a - Foundations:

The student will use foundational knowledge and skills while responding to, creating, and presenting artistic work.

Subpart 5b - Connect:

The student will understand that artistic works influence and are influenced by personal, societal, cultural, and historical contexts, including the contributions of Minnesota American Indian tribes and communities. 

National Core Arts Standard:

Relate artistic ideas and works with societal, cultural and historical context to deepen understanding.

Overview of Project

This will be the second part of a 3-part lesson series on the life and work of renowned painter Jack Whitten. We will explore his involvement in the Civil Rights movement of the 1960s*, his work as an artist in New York City, and his famous break from traditional painting techniques to collage work using hardened paint. 

This week, in Lesson 2, I will present a shorter slideshow to students to refresh their knowledge about Jack Whitten’s life and work. I will use questions about what we remember from last week to recap important points: What is abstraction? Who is Jack Whitten? Why do artists use abstraction? How did Jack Whitten paint? We will study geometric shapes by naming them and observing them within Whitten’s painting 9-11-01 (2006). We will talk about tessellations to introduce the geometric term. 

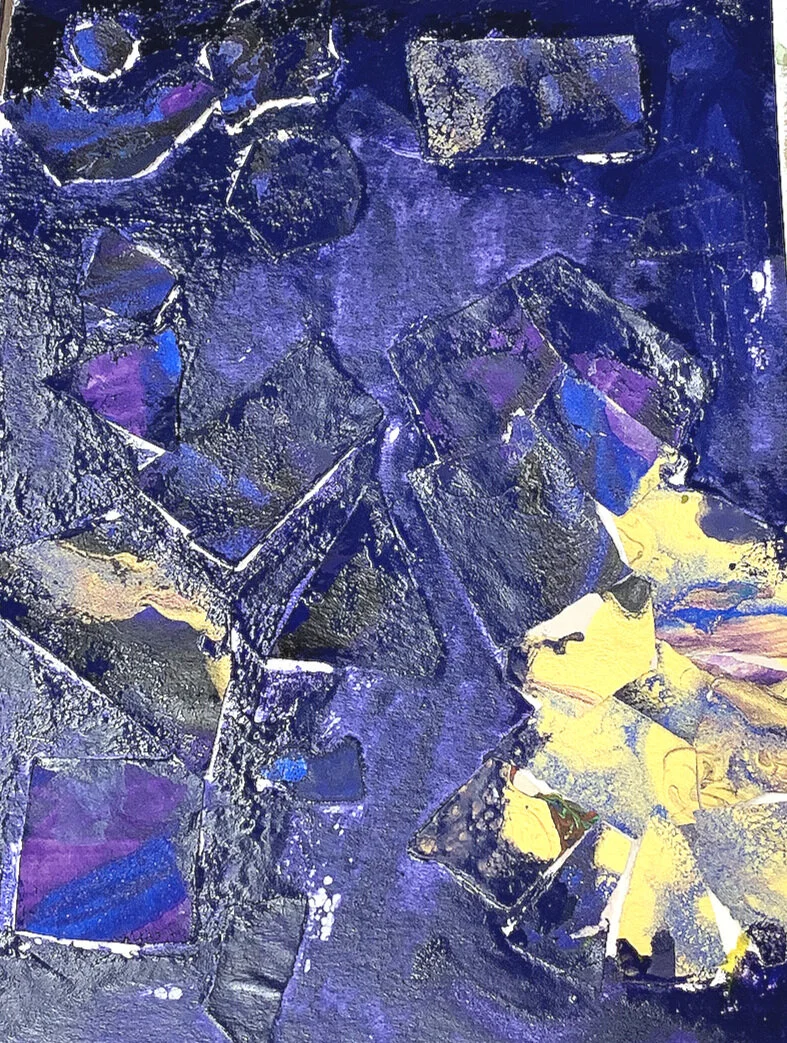
We will use geometric templates to trace shapes onto the back of our painted pages from last week. We will then cut them out and collage them with glue sticks to make tessellations on small canvases.

“Big Ideas”/ EssentialQuestion(s)

  • How can small shapes make up a big picture? Why do we look for smaller shapes?

  • What emotions do we feel when seeing and making political work?

  • What is abstraction? Why do we use it?

Student Outcome Objectives 

Students will:

1. Observe how Jack Whitten uses small geometric shapes to create large organic forms

2. Create work in the style of Jack Whitten

3. Learn rudimentary geometry terms

Prior Knowledge

Students have previously learned about figure drawing by combining simple shapes to draw more complex forms. This is an important foundational drawing skill, and will help them understand how to observe a large work with the intention of finding smaller shapes within it.

Students recently were taught about the Civil Rights movement of the 1960s, and learned about Jack Whitten’s life and work in the context of his experiences in the segregated South. 

Students learned about how Jack Whitten paints in a unique style, by pouring paint, breaking it up into dried chips, and then collaging them together.

Students learned about what abstraction is and why artists use it to express strong emotions.

Examples of Artwork

I have attached my slideshow here: with images for this week

Assessment

Notice shapes the children have used and ask “what is the name of this shape?” to gauge whether they responded to the geometry portion of the lesson. Ask questions about feelings and wandering thoughts while working. Ask if they see any images in their abstract work because of the way they have combined the shapes.

 Materials

  • Paint pours from last week

  • Sturdy watercolor paper

  • Glue sticks

  • Scissors

Teacher Reflection

Provide glue sticks/strong liquid glue and brushes if possible. We used the glue sticks each kid had in their desk. Some worked well and others peeled off the next day. I ended up spending an hour gluing lost pieces back onto their canvases, use strong glue to avoid this :)


Screen Shot 2021-05-05 at 1.11.58 AM.png
Screen Shot 2021-05-05 at 1.12.21 AM.png
Screen Shot 2021-05-05 at 1.13.02 AM.png

PART 3/3: Paint Collages Inspired by Jack Whitten

PART 3/3: Paint Collages Inspired by Jack Whitten

Planning Backwards Model 

Name of Project: PART 3/3: Paint Collages Inspired by Jack Whitten

 Teacher:  Lula McConnell

 Age or Grade Level: Prepared for 3rd grade

 Visual Arts Content / Standards

MN Arts Standard 3501.0820 

Subpart 1a - Foundations:

The student will use foundational knowledge and skills while responding to, creating, and presenting artistic work.

Subpart 5b - Connect:

The student will understand that artistic works influence and are influenced by personal, societal, cultural, and historical contexts, including the contributions of Minnesota American Indian tribes and communities. 

National Core Arts Standard:

Relate artistic ideas and works with societal, cultural and historical context to deepen understanding.


Overview of Project

This will be the third part of a 3-part lesson series based on the life and work of renowned painter Jack Whitten. We will explore his involvement in the Civil Rights movement of the 1960s*, his work as an artist in New York City, and his famous break from traditional painting techniques to collage work using hardened paint. 

This week, in Lesson 3, I will present a shorter slideshow reviewing content from the previous two lessons: Who is Jack Whitten? How does he paint? What is abstraction? Why do we use abstraction? What is a tesselation?

I will introduce the concept of background/foreground. We will use examples from Jack Whitten’s work as well as Faith Ringgold’s story quilts to differentiate the background from the foregeound in both abstract (Whitten) and representational (rRnggold) works. We will then add an acrylic wash background to our collages from the past two lessons. The watercolor paint bonds to the watercolor paper, but not to the acrylic paint. This provides a good opportunity to briefly discuss how paint is made and why different bases make paint work differently.

“Big Ideas”/ EssentialQuestion(s)

  • What emotions do we feel when seeing and making political work?

  • What is abstraction? Why do we use it?

  • How do two artists’ work in different styles relate to each other foundationally?

Student Outcome Objectives 

Students will:

1. Identify foregeound and backgoround in abstract and representational work

2. Create work in the style of Jack Whitten

3. Experiment with latering different paint types

Prior Knowledge

Students have now spent two weeks learning about abstraction, innovating painting techniques, and the work of Jack Whitten.

In the past, I taught a lesson on how to make paint by mixing pigment with a base, so the kids have some background knowledge of differences between paints.

Students previously completed a lesson with a fellow teaching artist based on Faith Ringgold’s story quilts.

Examples of Artwork

See (and feel free to use) attached slideshow:

Assessment

This will be our final lesson in the style of Jack Whitten. Observe final compositions, how students choose to combine colors. Do students notice that the watercolor bonds with the blank watercolor paper but not the acrylic paint chips? Can the students tell me which part of their work is the background and which is the foreground? Can students connect their emotions to the work they are creating?

Materials

  • Paint pours collages from last week

  • watercolor sets, 1 per child

  • paintbrushes

  • cups w/ water for rinsing & paper towels for drying

Teacher Reflection

Some demo on how to clean watercolor brushes would have been helpful. I started demoing the watercolors and a lot of kids were like “we know how to use watercolors!” I should have continued to demo, because it was clear that many kids did not, but I stopped. Definitely demo these skills so you don’t end up with a bunch of all brown watercolor pallettes.


Screen Shot 2021-05-05 at 1.33.49 AM.png
Screen Shot 2021-05-05 at 1.34.49 AM.png
Screen Shot 2021-05-05 at 1.35.08 AM.png
Screen Shot 2021-05-05 at 1.34.15 AM.png

Ancient Greece Vases

Ancient Greece Vases

Age or Grade Level:  4th Grade


VISUAL ARTS CONTENT / STANDARDS


Code:  4.1.1.5.1

Grade:  4th Grade

Strand:  Artistic Foundations

Substrand: 1. Describe the characteristics of the elements of visual art including color, line, shape, value, form, texture, and space. 

Standard: 1. Demonstrate knowledge of the foundations of the arts area. 


CURRICULAR LINK / STANDARDS, IF APPLICABLE

English

Code: 4.1.4.4

Grade:  4th Grade

Strand:  Reading

Substrand: Craft and Structure

Standard: Determine the meaning of words and phrases as they are used in a text, including those that allude to significant characters found in mythology (e.g., Herculean). (Allegories, Fables)

OVERVIEW OF PROJECT

  Create an ancient greek vase using the imagery from Greek mythology Gods and Goddesses.  Connect the images to everyday life and themselves.  (Midas Tire, Nike, Apollo Theater, ect)


“BIG IDEAS”/ ESSENTIAL QUESTION(S)

  The big idea for this lesson is to connect ancient greek mythology to everyday life.  

What do these symbols mean and why did you choose them? 

STUDENT OUTCOME OBJECTIVES

Students will:

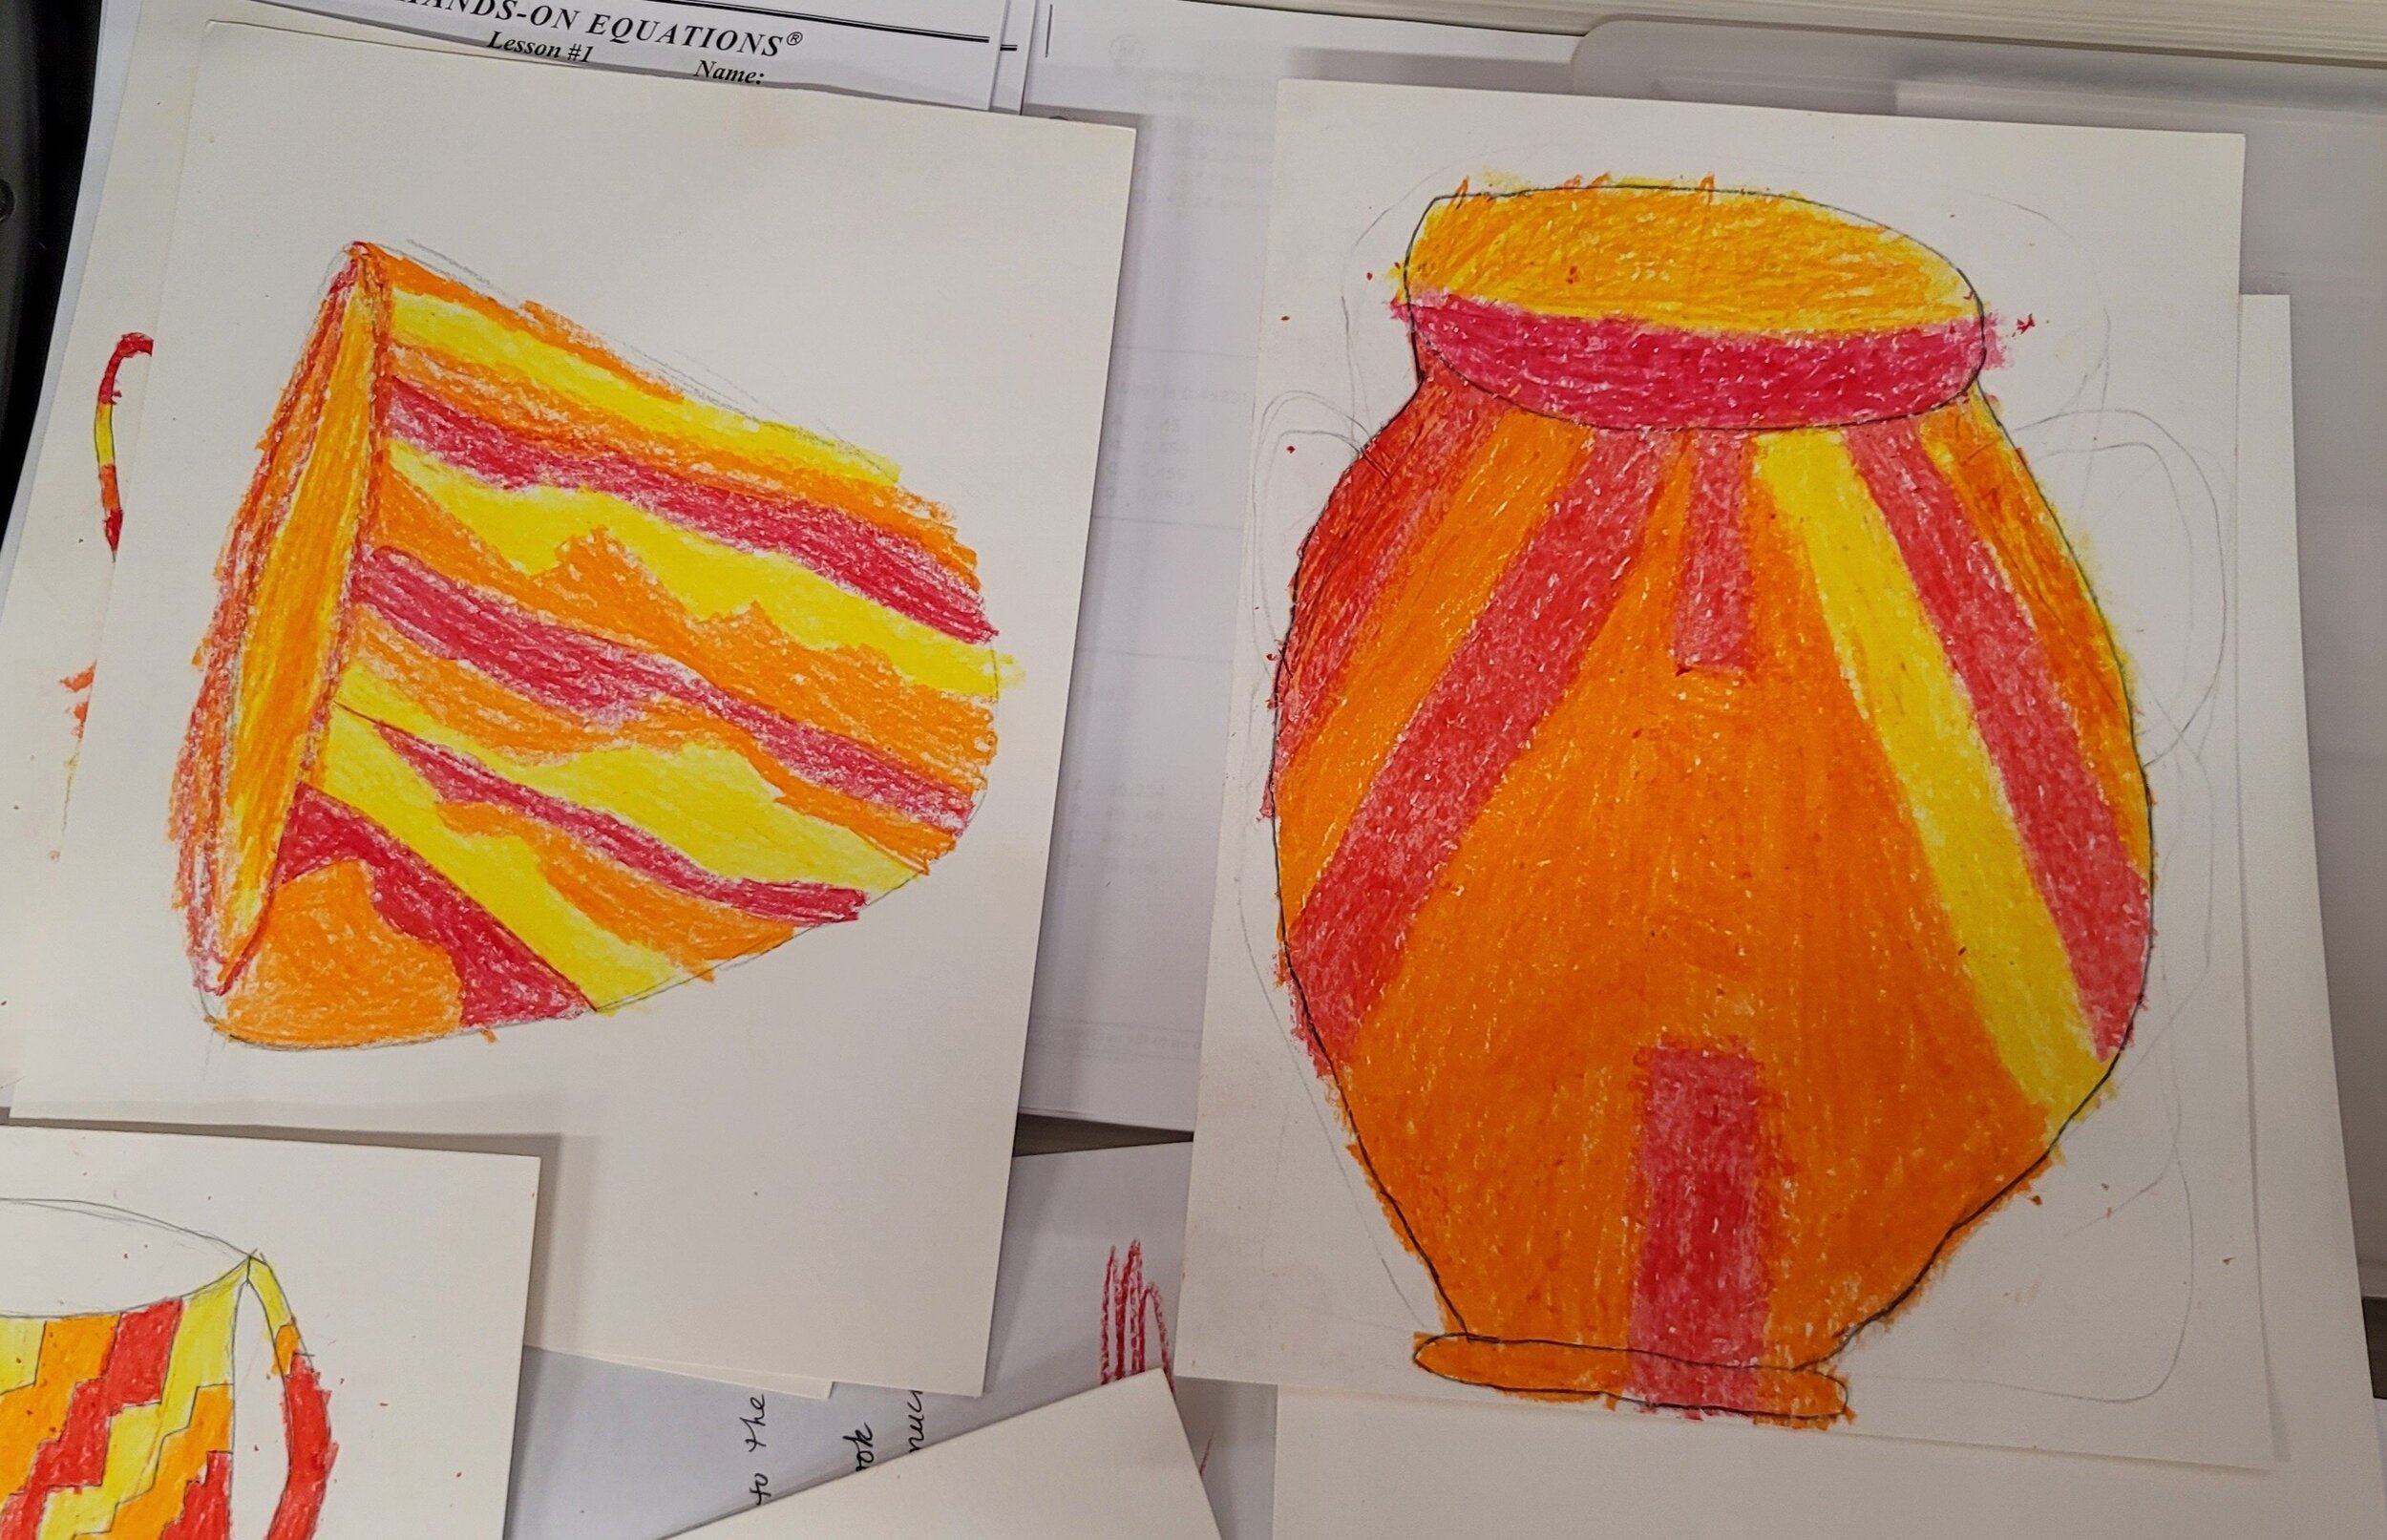
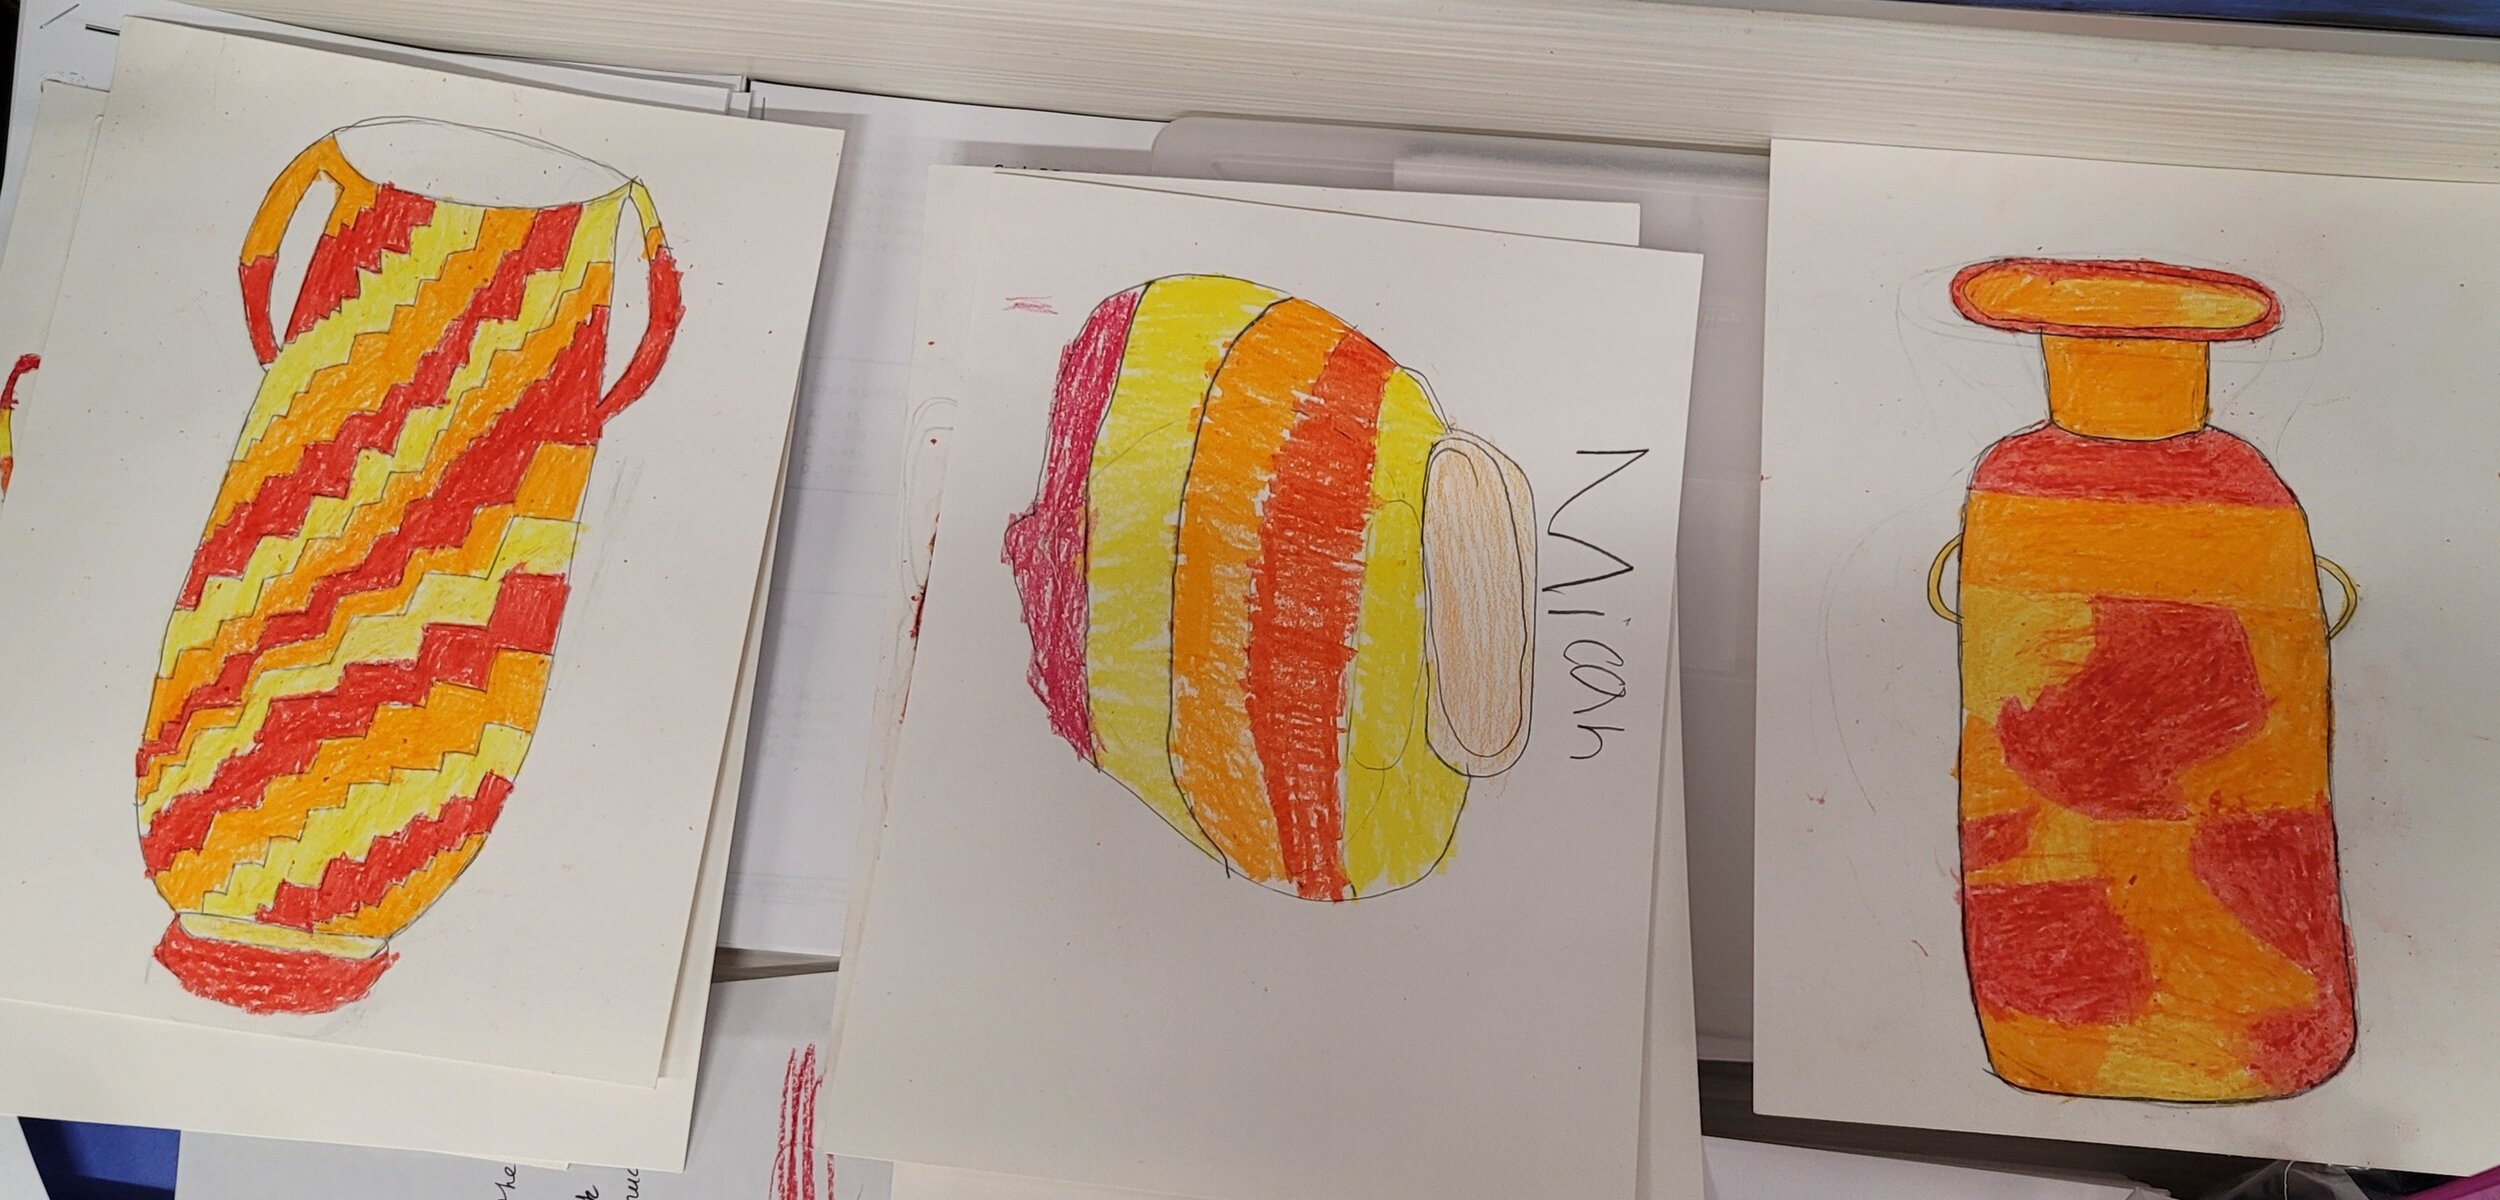
  1. Create a scratch off vase.

  2. Illustrate an image from a Greek allegory/fable relating to everyday life. 


PRIOR KNOWLEDGE

 The students should have prior knowledge of  Greek Mythology, of Greek Allegories, and allusions.

TEAM LESSON PREPARATION TIMELINE

  • Create draft lesson plan 03/17

  • Teach drafting part of lesson 03/17

  • Teach lesson on 03/22


EXAMPLES OF ARTWORK

I will show examples of ancient Greece vases to inspire the students.  I will also create an example for the students and create with them. 


ADDITIONAL RESOURCES 

Greek mythology books, powerpoint about greek allusions


ASSESSMENT

See http://artsedge.kennedy-center.org/educators/how-to/supporting-individual-needs/do-tell-giving-feedback.aspx for a varied list of assessment techniques in the arts.

 I will grade these based on how they connect greek mythology symbols to their own personalities, also how they use line, patterns, and shape according to the elements of art. 

MATERIALS

  • Paper

  • Kabob Sticks

  • Paint

  • Paint Brushes

  • Soap

  • Little cups

  • Orange and Red Crayons

  • Pencil

LEARNING ACTIVITIES AND TIMING

Day 1:

  1. Create a draft drawing of the vase based on the images on the slide show (slide 3).  Just a simple outline of the vases. (15min)

  2. Show Slideshow, slide 2. About the background of ancient greek vases.  (3min)

  3. Go over the project and have the students figure out some images to etch into their vases.  Slides 4 and 6 (10min)

Day 2 (could combine with day 1):

  1. Gather Supplies for the project  (5min)

  2. Show slides 3 for examples of vase shapes.  Have the students draw their vase on their piece of paper, color in.  (20min)

  3. Paint over with black paint. Let dry.  (5min)

Day 3:

  1. Show slides 4 and 6 with examples. Have the students draw on scratch paper with their ideas. (10min)

  2. Start etching patterns into the vase. Talk about the elements and principles of art specifically pattern, line, and shape. Slide 5  (5min)

  3. Etch the image onto the vase of the greek allegory they chose. (10min)

  4. Done :) write names on papers.

Suminagashi Lesson Plan

Suminagashi Lesson Plan

DIY Suminagashi

Age of participants: 12+

Organization: greer c workshop for the arts

MCAD teaching artist: greer coffman

Number of students: 2

Overview of Project

● In this project we will come together to explore the printmaking technique Suminagashi! We will be focusing

on a DIY approach, mixing traditional techniques with a slightly more home-friendly, experimental focus.

Ideas Explored

● Exploring the more accessible sides of printmaking

● Control vs chaos, and controlling the chaos

● Nature vs nurture, in terms of the development of an art piece

Student Outcome Objectives

Students will:

1. learn about the art of suminagashi

2. experiment with different ways to effect the ink on the surface of the water

3. Create their own suminagashi prints as a result of their knowledge and experimentation

Prior Knowledge

● usage of a paint brush

Lesson Preparation Timeline

● Took a class on suminagashi

● Experimented and practiced it

● Cut down 60+ sheets of paper

Examples of Artwork

● A variety of my own personal prints

● Natalie Stopka

● Wandering and Orinoco Flow by CHEUK Ka-wai, Cherie

● Tadao Fukuda

Additional Resources:

● suminagashi.com

● https://www.pinterest.com/gomeditate/suminagashi/

● https://www.youtube.com/watch?v=GdgRQf6UiDM&ab_channel=RokoleeDIY

● http://marblinginspain.blogspot.com/2009/11/suminagashi-and-harunobu.html

Assessment:

● Do the students leave the class with a basic understanding of suminagashi?

● Did everyone have a good time?

● Will the students be able to replicate this on their own time if they please?

Materials

● empty hummus containers x3

● 30 precut 3x3 sheets of mullberry paper

● 30 precut 3x3 sheets of handmade paper

● a variety of paint brushes including sumi brushes

● one container of sumi ink

● small containers to hold ink

● spray bottle x3

● 5 hand towels

● 1 gallon of water

● dishwashing liquid

Learning Activities and Timeline

● Single day workshop, 1 hour

● 25 minutes of more traditionally structured suminagashi demonstrations + troubleshooting

○ 5 minutes: Start with stretches and setting the space for suminagashi, physically and mentally

○ 2 minutes: Go over a brief description and history of suminagashi

○ 5 minutes: Start demoing

○ 10 minutes: After one demo is complete, we will work in tandem to create together

○ Once that demo is done, the participants will work independently with suminagashi as I provide

assistance and troubleshooting

● 35 minutes of open work/experiment time

○ We will conclude with creating 3 collaborative suminagashi pieces together that we can each take

home (all of the students individual work they will be able to take home too).

 Catchphrases 2020-2021

Catchphrases 2020-2021

Age or Grade Level:  4th Grade


VISUAL ARTS CONTENT / STANDARDS

Code:  4.2.1.5.1, 4.1.3.5.1, 4.1.3.5.2

Grade:  4th Grade

Strand:  Create and Make, and Foundations

Substrand:  1. Create original two- and-three-dimensional artworks to express specific artistic ideas. 

1. Describe the personal, social, cultural, or historical contexts that influence the creation of visual artworks including the contributions of Minnesota American Indian tribes and communities. 2. Describe how visual art communicates meaning. 

Standard: 1. Create or make in a variety of contexts in the arts area using the artistic foundations. 

3. Demonstrate understanding of the personal, social, cultural and historical contexts that influence the arts areas. 


CURRICULAR LINK / STANDARDS, IF APPLICABLE

English

Code:4.6.10.10, 4.6.6.6, 4.6.5.5 

Grade:  4th Grade

Strand:  

Substrand: 

Standard: Write routinely over extended time frames (time for research, reflection, and revision) and shorter time frames (a single sitting or a day or two) for a range of discipline-specific tasks, purposes,and audiences. a. Independently select writing topics and formats for personal, enjoyment interest, and academic tasks. 

With some guidance and support from adults, use technology, including the Internet, to produce and publish writing as well as to interact and collaborate with others; demonstrate sufficient command of keyboarding skills to type a minimum of one page in a single sitting.

With guidance and support from peers and adults, use a writing process to develop and strengthen writing as needed by planning, drafting, revising, and editing. (Editing for conventions should demonstrate command of Language standards 1–3 up to and including grade 4 on page 41-42.)


OVERVIEW OF PROJECT

Create a catchphrase banner with a catchphrase from 2020-2021 DL.  With the banner, they will write a short narrative about a time they remember using/hearing that catchphrase.  


“BIG IDEAS”/ ESSENTIAL QUESTION(S)

  The big idea for this lesson is to show how we change with the time and develop new catchphrases for the different experiences we have such as the pandemic and virtual learning. They are making a banner so they can hang it up in their home and have something new they created that is different than just paper.  Through quarantine a lot of us learned new things and activities so this will be a new creation they haven't made before.  To represent learning new things in quarantine/a pandemic. 

STUDENT OUTCOME OBJECTIVES

Students will:

  1. Write a grammatically correct narrative.

  2. Learn how to make a banner by folding and cutting.

  3. Draw, cut and glue.  

  4. Present their work to a public by uploading images of their art and writing to their websites.   


PRIOR KNOWLEDGE

  The students should have prior knowledge on how to write grammatically correct and how to write a narrative.  They also should already know how to cut and write letters. 

TEAM LESSON PREPARATION TIMELINE

  • Gather supplies

  • Figure out the standards for this lesson

  • Draft due to Aki by Saturday at 11:59pm. 

  • Final Draft due to Aki by Monday at 11:59pm.

  • Teach lesson on Wednesday Feb 17th. 

EXAMPLES OF ARTWORK

 I have created an example of the banner for the students to see and will make one with them as I teach.  Show examples of textiles works. 

ASSESSMENT

See http://artsedge.kennedy-center.org/educators/how-to/supporting-individual-needs/do-tell-giving-feedback.aspx for a varied list of assessment techniques in the arts.

 I will grade these based on if they wrote grammatically correct and their narrative makes sense.  I will also grade on their creativity, following directions, and if they did it correctly. 


MATERIALS

  • Scissors

  • Glue sticks

  • Ribbon

  • Hole Puncher

  • Felt Sheets (36)

  • Fabric Markers 

  • 2 boxes for dirty and clean markers

  • Pencil

  • Catchphrase prep page

LEARNING ACTIVITIES AND TIMING

  1. Have the students gather all their supplies, pass out the felt sheets, have markers prepped in the clean box and have the dirty box set up with disinfectant nearby. (2 min)

  2. Start by cutting the felt into a banner shape, have them fold in half, and make ⅓ up from bottom, open draw lines down to corners and then cut the triangle out. Punch holes into the top of the banner before they start drawing to give them a guide. (5 min)

  3. Have the kids write out their catchphrase in pencil, make sure to have them measure out to have equal spacing.  Check spelling and grammar. Talk to them about choosing colors and text style for their piece in order to express feelings. (20 min)

  4. The students can now write their catchphrase in fabric markers.  WARNING: they are permanent! Have them come up and grab a marker, if they want to switch colors they have to put the marker they were using in the dirty box, only grab from the clean box.  (20 min)

  5. The kids now can add the string to their banners, tie the string through each hole.  May need to assist with this part.  (10 min)

  6. For the final part the kids will write a short narrative about a time they used or heard the catchphrase be using during online schooling. (CAN BE DONE ANOTHER DAY)  (15 min)

  7. Then cut the narrative out and glue to the back of their catchphrase banner.  Make sure they write their names on the banner somewhere.  (5 min)

  8. The students will be uploading their work to their websites after the lesson (mostly likely the next day).  They will take photos of both their writing and banner to put on their website.